When I first started potting, almost every potter I spoke with or read told me that sanding pots was a waste of time. Some of them even thought trimming was a waste of time and only showed that a pot had not been well thrown. I ignored all of this, maybe to my detriment. I sand all of my pots at different stages using different materials and techniques. Most pots only need a light sanding around the foot to smooth them out. A smaller number need more extensive sanding.
The main reason I wrote this blog was because of what I saw at HPG all of the time: potters who were struggling to smooth their bisqued or glaze fired pots using garnet or emery sandpaper, the sort of sandpaper most people use on wood or metal. They'd be holding their pots over a trash can and sanding away all morning but never really smoothing the surface as well as they wanted. These sandpapers might be okay for sanding greenware (though green scrub pads are probably better), but they're not efficient at smoothing bisqued or glazed pots. Another reason I wrote it was because of what I saw too often at pottery sales: customers who wouldn't buy pots because their surfaces, especially their bottom surfaces, were too rough. They didn't want pots that would scratch their tables or pianos. What I heard most often were comments from customers about pots that were "not finished well," "poor craftsmanship," and the like. Why lose sales like this when it's so easy to smooth the bottom of a pot?
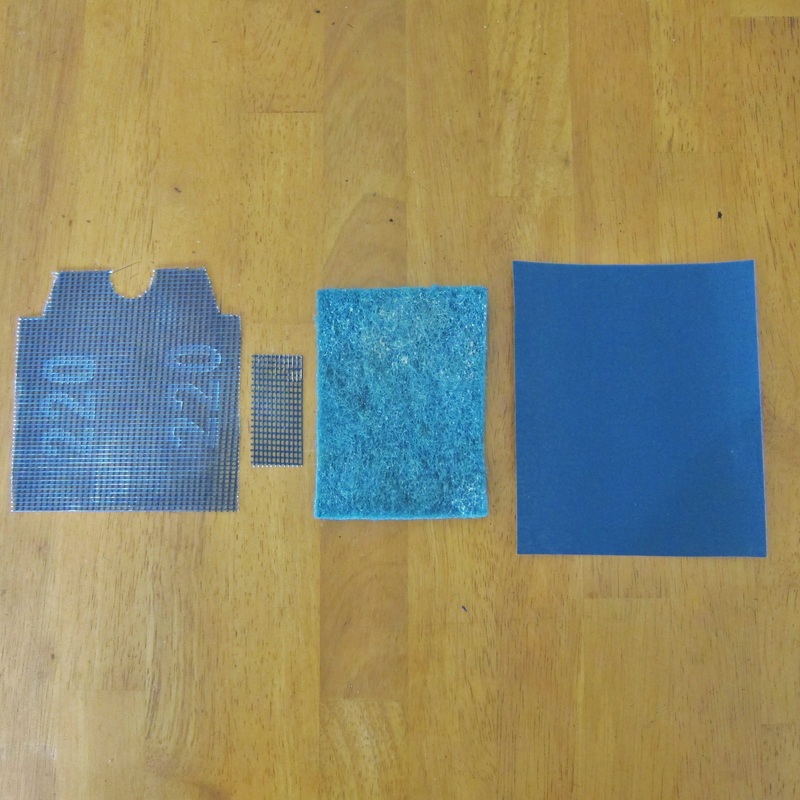
The image above has several things I use to sand pots. The first two on the left are silicon carbide dry wall sanding screens made by Gator (www.gatorfinishing.com). The larger is half of a sanding screen that I cut with scissors and the other is a small piece I cut for sanding hard to get at places. Silicon carbide works so well on bisqued and glaze fired ceramics because it's so tough. Kiln shelves are made of the same material. Next is a green 3M scrub pad, the sort of thing you can buy at any grocery store. When these scrub pads are new, they're thick and stiff, useful for sanding large areas. After these pads have been used for awhile, they become thin and flexible and useful for sanding delicate areas like rims and anything that's been carved. The sandpaper on the far right is silicon carbide sandpaper made by Gator and especially good at giving more coarsely sanded pots a silky finish.
I use 80, 120, and 220 grade silicon carbide sanding screens to sand bisqued or glaze fired pots where they need it. If I only want to sand the bottom of a glaze fired piece, I grab an 80 grit sanding screen and the bottom of any pot is smooth in about 10 seconds. I don't care if it's Soldate 60, Rod's Bod, or Death Valley, every one of these groggy clays will be smooth in about 10 seconds if I use a silicon carbide sanding screen. You can achieve the same result with silicon carbide sandpaper, but the sandpaper wears out quickly so you go through several pieces of sandpaper before achieving the smoothness you want. Sanding screens are tougher and can be used several times before they're worn out. If I want to sand the outside of a bowl and make it as smooth as possible, I'll use the sanding screens first and then go to 320, 400, and 600 grit silicon carbide sandpaper. I started out using pieces of silicon carbide kiln shelves to smooth the bottoms of pots or even the sides of bowls, but I ended up chipping the edges too many times and the sound of a kiln shelf smoothing the side of a bowl is worse than fingernails dragging across a blackboard.
I sand stoneware differently than I sand porcelain. I sand green stoneware as little as possible before bisquing it, usually only around the edge of the foot and rim. If I sand large areas of a stoneware pot with green pads or a screen, it roughens the surface and makes it less smooth because it loosens the grog which rips through the soft clay. Of course, if that's the effect you're after then go for it! I usually don't sand bisqued stoneware at all unless I notice it has sharp edges. I've found that if edges are too sharp, they tend to chip in the glaze firing. After stoneware pots are fired to cone 10, I use a sanding screen, usually 80 grit, to smooth the bottom of the foot. If there are large areas of bare clay that are exposed like on the outside of bowls, I use the sanding screens to smooth the surface and then switch to sandpaper. If I want a super smooth surface, I'll use water with the sandpaper.
With green porcelain (or porcelainous clay like BMix), I usually sand the whole pot when it's completely dry with green scrub pads. If the pot needs extensive sanding, I'll start with an 80 grit silicon carbide sanding screen to remove material more quickly and then use a green scrub pad to make the surface smoother. I keep my pads for porcelain separate from my pads for stoneware so I get as little spotting on my porcelain as possible. But if I happen to get a spot or two from some impurity, I consider it a "beauty spot." I only sand bisqued porcelain if it has edges that are too sharp. I've made quite a few porcelain pieces that have no glaze on them at all. After they come out of the cone 10 firing, I do not sand them with silicon carbide sanding screens because they tend to leave marks on the surface that are hard to sand out. I start with 320 silicon carbide sandpaper, then 400, and finish with 600. By the time I'm finished, the surface of the clay has a satiny texture. You can always go farther than this by using diamond-embedded pads that go up to 3000 grit or higher, but I've never been able to feel the difference past 600, even on porcelain.
If a piece is carved, whether it's stoneware or porcelain, I'll sand the carving very carefully with a worn and flexible piece of green scrub pad. I don't try to do too much of this, but I concentrate on places where I think the finished pot might have sharp edges, especially with porcelain. I've found that I'm more apt to knock pieces off at this stage and it's also unnecessary to make the surface perfectly smooth. Most of it will be covered by glazes and the uneven edges often make the glazes break in more interesting ways. If I feel the need to do more sanding on places I've carved, I'll wait til the piece has been bisqued and then use a white sharpening rod whose corners have been rounded (not pictured) to remove more material. I've found that when I sand greenware pots, I have to thoroughly wash them after they've been bisqued and then let them dry completely before glazing. If a piece has been sanded, clay dust is all over the pot, even if you've been careful to remove as much as possible. I pay close attention to pots that are carved since clay dust settles in crevices and I always use a toothbrush to get it out. If you don't get all of the dust off a pot, you'll have plenty of glaze problems later.
Safety is an important concern when you're sanding pots. Doing it over a garbage can or a bowl of water doesn't help. Sure, large particles of clay dust will fall in the garbage can or in the water, but we should all be more aware of the really fine clay dust that will stay suspended in the air for up to 2 days and can end up in our lungs and the unsuspecting lungs of our friends. When I sand pots, I'm always outside and a good distance from the studio. (Okay, that's easier to do in January when you live in Hawaii!) I wear a mask to protect myself, the same mask I use for spraying pieces that's minimally adequate: 3M N95. I don't take off my mask to blow dust off the piece. I use a soft brush to do that and use a damp sponge to take off the rest. I use the same brush and sponge to take dust off my clothes and I wash my hands and arms with soap and water when I go back into the studio. I clean my apron regularly. Do whatever you can to minimize clay dust in the air.
The final observation I'll make is to be very careful how you handle your pieces when you sand them, especially when you sand greenware. Be aware of every part of your body and how it should touch the clay. Just two days ago I was sanding a bowl that I'd carved. I was trying out a new pattern around the rim and was pleased with how it looked. I'd successfully trimmed the foot which is always tricky to do without knocking something off. I let it dry a few more days while covered, and then I started to sand it just a little. When I turned the bowl over to sand the foot a bit (something I've done many times), the rim hit my forearm and knocked a 6-inch piece off. Had to recycle the whole thing. If you do turn a bowl upside down to sand it, make sure the fingers of your hand are spread out widely enough so it doesn't move when you turn it over. So make sure you really think about what you're doing every time you sand a piece and CONCENTRATE!
The main reason I wrote this blog was because of what I saw at HPG all of the time: potters who were struggling to smooth their bisqued or glaze fired pots using garnet or emery sandpaper, the sort of sandpaper most people use on wood or metal. They'd be holding their pots over a trash can and sanding away all morning but never really smoothing the surface as well as they wanted. These sandpapers might be okay for sanding greenware (though green scrub pads are probably better), but they're not efficient at smoothing bisqued or glazed pots. Another reason I wrote it was because of what I saw too often at pottery sales: customers who wouldn't buy pots because their surfaces, especially their bottom surfaces, were too rough. They didn't want pots that would scratch their tables or pianos. What I heard most often were comments from customers about pots that were "not finished well," "poor craftsmanship," and the like. Why lose sales like this when it's so easy to smooth the bottom of a pot?
The image above has several things I use to sand pots. The first two on the left are silicon carbide dry wall sanding screens made by Gator (www.gatorfinishing.com). The larger is half of a sanding screen that I cut with scissors and the other is a small piece I cut for sanding hard to get at places. Silicon carbide works so well on bisqued and glaze fired ceramics because it's so tough. Kiln shelves are made of the same material. Next is a green 3M scrub pad, the sort of thing you can buy at any grocery store. When these scrub pads are new, they're thick and stiff, useful for sanding large areas. After these pads have been used for awhile, they become thin and flexible and useful for sanding delicate areas like rims and anything that's been carved. The sandpaper on the far right is silicon carbide sandpaper made by Gator and especially good at giving more coarsely sanded pots a silky finish.
I use 80, 120, and 220 grade silicon carbide sanding screens to sand bisqued or glaze fired pots where they need it. If I only want to sand the bottom of a glaze fired piece, I grab an 80 grit sanding screen and the bottom of any pot is smooth in about 10 seconds. I don't care if it's Soldate 60, Rod's Bod, or Death Valley, every one of these groggy clays will be smooth in about 10 seconds if I use a silicon carbide sanding screen. You can achieve the same result with silicon carbide sandpaper, but the sandpaper wears out quickly so you go through several pieces of sandpaper before achieving the smoothness you want. Sanding screens are tougher and can be used several times before they're worn out. If I want to sand the outside of a bowl and make it as smooth as possible, I'll use the sanding screens first and then go to 320, 400, and 600 grit silicon carbide sandpaper. I started out using pieces of silicon carbide kiln shelves to smooth the bottoms of pots or even the sides of bowls, but I ended up chipping the edges too many times and the sound of a kiln shelf smoothing the side of a bowl is worse than fingernails dragging across a blackboard.
I sand stoneware differently than I sand porcelain. I sand green stoneware as little as possible before bisquing it, usually only around the edge of the foot and rim. If I sand large areas of a stoneware pot with green pads or a screen, it roughens the surface and makes it less smooth because it loosens the grog which rips through the soft clay. Of course, if that's the effect you're after then go for it! I usually don't sand bisqued stoneware at all unless I notice it has sharp edges. I've found that if edges are too sharp, they tend to chip in the glaze firing. After stoneware pots are fired to cone 10, I use a sanding screen, usually 80 grit, to smooth the bottom of the foot. If there are large areas of bare clay that are exposed like on the outside of bowls, I use the sanding screens to smooth the surface and then switch to sandpaper. If I want a super smooth surface, I'll use water with the sandpaper.
With green porcelain (or porcelainous clay like BMix), I usually sand the whole pot when it's completely dry with green scrub pads. If the pot needs extensive sanding, I'll start with an 80 grit silicon carbide sanding screen to remove material more quickly and then use a green scrub pad to make the surface smoother. I keep my pads for porcelain separate from my pads for stoneware so I get as little spotting on my porcelain as possible. But if I happen to get a spot or two from some impurity, I consider it a "beauty spot." I only sand bisqued porcelain if it has edges that are too sharp. I've made quite a few porcelain pieces that have no glaze on them at all. After they come out of the cone 10 firing, I do not sand them with silicon carbide sanding screens because they tend to leave marks on the surface that are hard to sand out. I start with 320 silicon carbide sandpaper, then 400, and finish with 600. By the time I'm finished, the surface of the clay has a satiny texture. You can always go farther than this by using diamond-embedded pads that go up to 3000 grit or higher, but I've never been able to feel the difference past 600, even on porcelain.
If a piece is carved, whether it's stoneware or porcelain, I'll sand the carving very carefully with a worn and flexible piece of green scrub pad. I don't try to do too much of this, but I concentrate on places where I think the finished pot might have sharp edges, especially with porcelain. I've found that I'm more apt to knock pieces off at this stage and it's also unnecessary to make the surface perfectly smooth. Most of it will be covered by glazes and the uneven edges often make the glazes break in more interesting ways. If I feel the need to do more sanding on places I've carved, I'll wait til the piece has been bisqued and then use a white sharpening rod whose corners have been rounded (not pictured) to remove more material. I've found that when I sand greenware pots, I have to thoroughly wash them after they've been bisqued and then let them dry completely before glazing. If a piece has been sanded, clay dust is all over the pot, even if you've been careful to remove as much as possible. I pay close attention to pots that are carved since clay dust settles in crevices and I always use a toothbrush to get it out. If you don't get all of the dust off a pot, you'll have plenty of glaze problems later.
Safety is an important concern when you're sanding pots. Doing it over a garbage can or a bowl of water doesn't help. Sure, large particles of clay dust will fall in the garbage can or in the water, but we should all be more aware of the really fine clay dust that will stay suspended in the air for up to 2 days and can end up in our lungs and the unsuspecting lungs of our friends. When I sand pots, I'm always outside and a good distance from the studio. (Okay, that's easier to do in January when you live in Hawaii!) I wear a mask to protect myself, the same mask I use for spraying pieces that's minimally adequate: 3M N95. I don't take off my mask to blow dust off the piece. I use a soft brush to do that and use a damp sponge to take off the rest. I use the same brush and sponge to take dust off my clothes and I wash my hands and arms with soap and water when I go back into the studio. I clean my apron regularly. Do whatever you can to minimize clay dust in the air.
The final observation I'll make is to be very careful how you handle your pieces when you sand them, especially when you sand greenware. Be aware of every part of your body and how it should touch the clay. Just two days ago I was sanding a bowl that I'd carved. I was trying out a new pattern around the rim and was pleased with how it looked. I'd successfully trimmed the foot which is always tricky to do without knocking something off. I let it dry a few more days while covered, and then I started to sand it just a little. When I turned the bowl over to sand the foot a bit (something I've done many times), the rim hit my forearm and knocked a 6-inch piece off. Had to recycle the whole thing. If you do turn a bowl upside down to sand it, make sure the fingers of your hand are spread out widely enough so it doesn't move when you turn it over. So make sure you really think about what you're doing every time you sand a piece and CONCENTRATE!
 RSS Feed