To prepare for pit firing at home, I'd ordered a Behrens 17 gallon round steel tub from Amazon which seemed about the right size for my needs. Maybe I'll get a larger one later or pick up a 55 gallon drum that's been cut in half, but I can fire at least two large pots in it or three medium size ones. I could get more in if I decided to stack pots, something I plan on doing sometime soon. I found a reliable source for Kiawe wood at Hardware Hawaii in Kailua and spent about $12 on this firing. The pieces of wood were too large so I used my machete to split them into smaller pieces. That's something I've learned after several pit firings: the wood needs to be cut pretty small for the fire to really get hot. I had to use large pieces of wood for almost every pit firing up to now and it took forever to get the fire going, it never got hot enough to give all of the pots really good color, and I breathed in too many noxious fumes leaning over the pit with my blow torch. I also thought it would be good to use small pieces of wood after watching a video about wood firing in Onda Japan. They use very thin pieces of wood when they want the temperature of the fire to go up quickly. I'm not afraid of making the fire go up quickly in the pit since I'm using clay bodies (B-Mix with Grog or Nash White) which have proven their ability to withstand thermal shock doing raku.
The wood shavings I use at the bottom of the pit are intended for horse bedding so fairly coarse. I've seen people use fine wood shavings that were almost like sawdust but the results have never been very good. The shavings are so dense that it's hard for air to get into them so they don't burn all the way to the bottom. By the way, try using the metal basket of an old washing machine for pit firing. Steve Martin uses one and it always gets great results for small to medium size pieces. The basket has perforations all the way around that are small enough to keep the wood shavings in but large enough to allow air to circulate through on every side from top to bottom.
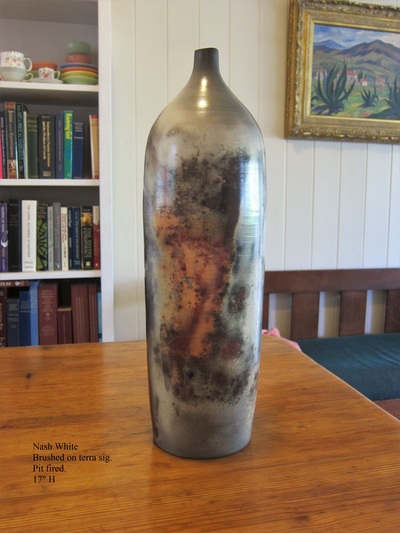
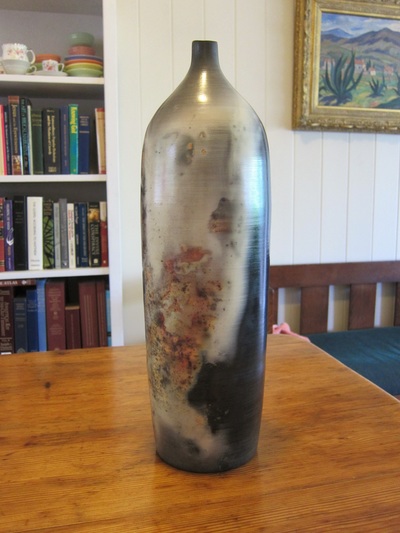
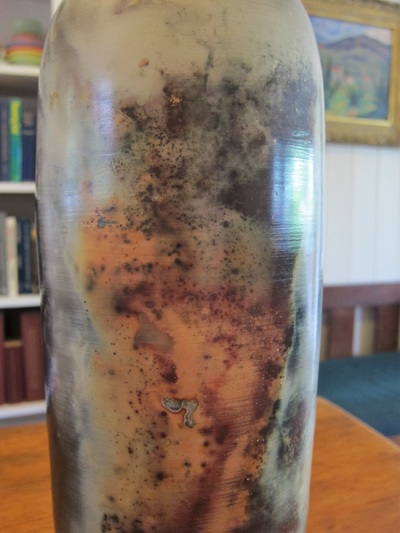
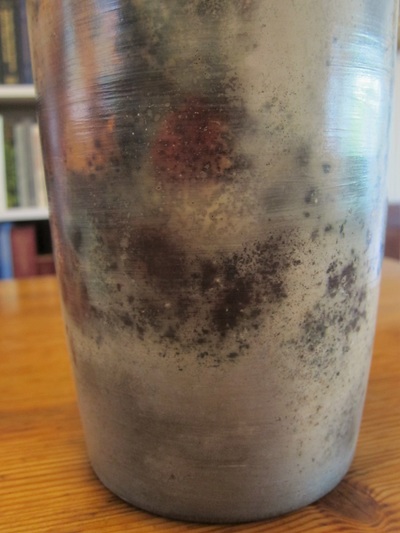
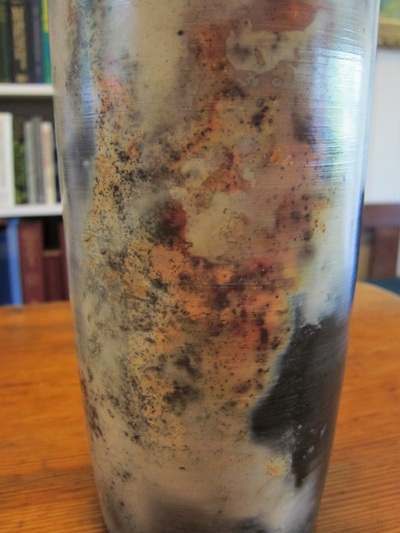
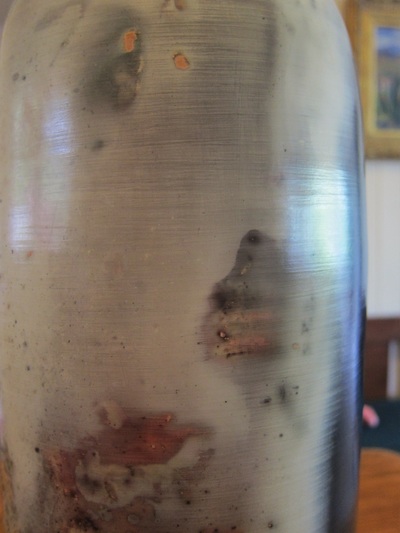
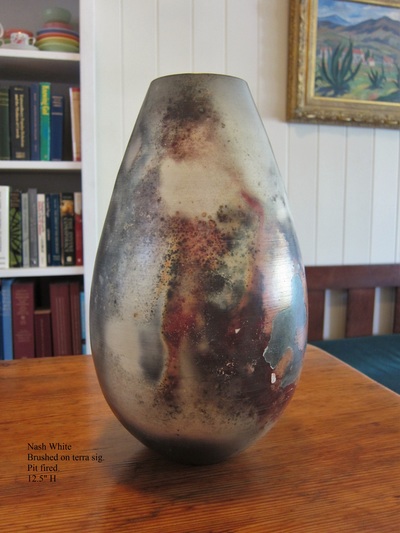
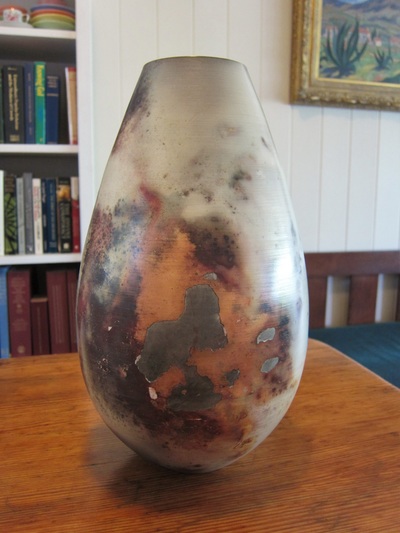
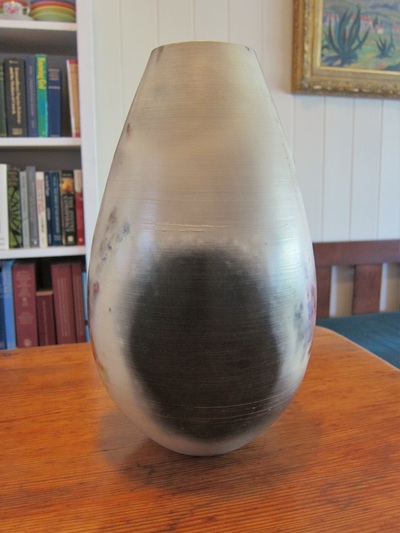
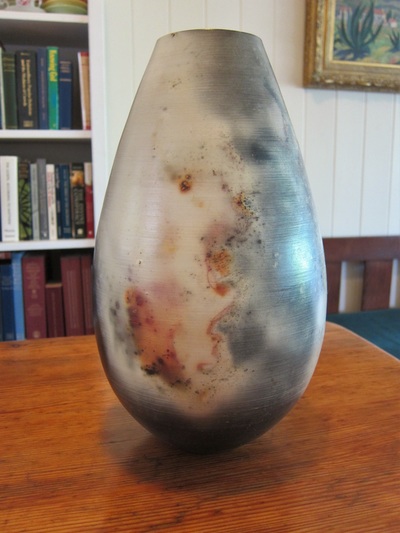
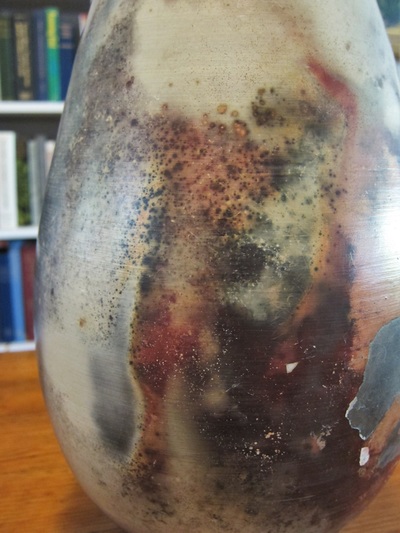
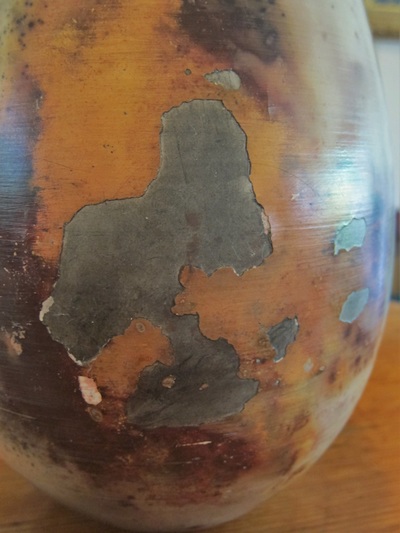
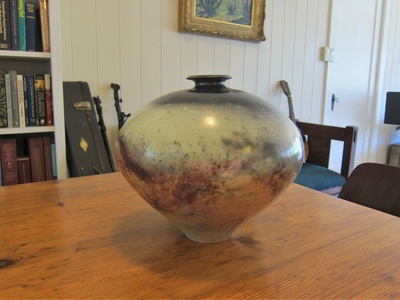
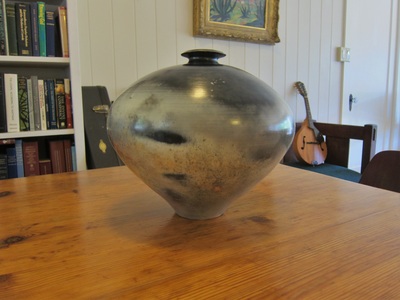
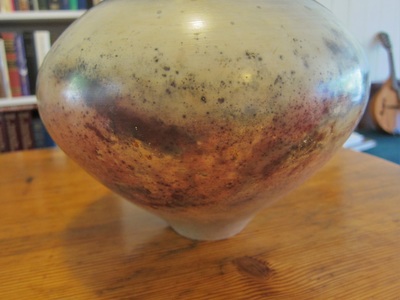
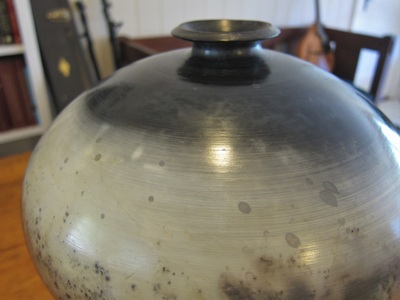
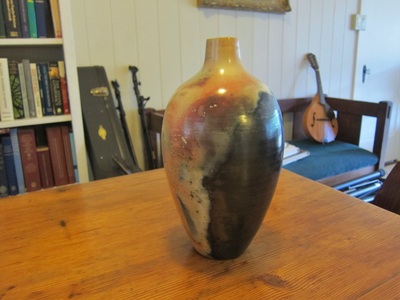
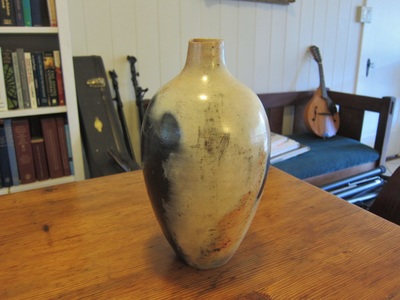
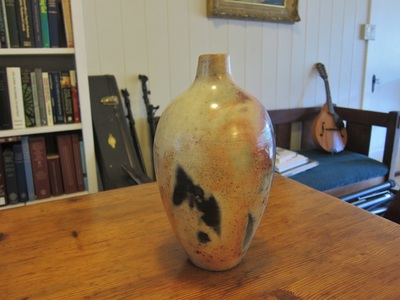
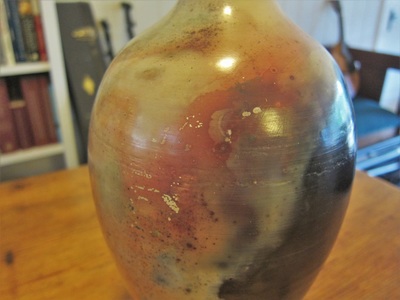
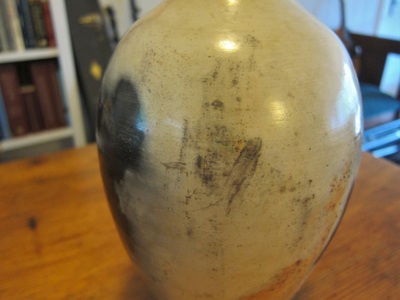
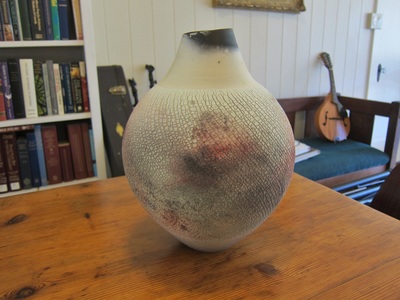
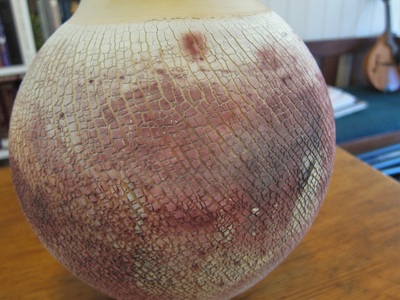
I laid my two pots on the wood shavings and then laid around them the usual things I use to make marks on the pots: salt, copper carbonate, red iron oxide, banana peels, coffee grounds, and seaweed. I pulled apart both fine and coarse steel wool and laid that lightly on top of both pots. Next I put on layers of newspaper, then a layer of drift wood, and finally kiawe wood. I used a blow torch to start the fire rather than using lighter fluid. I think next time I'll use lighter fluid since this time I got the torch too close to one of the pots for too long which may have caused the terra sig to peel in that area. The fire got going much more quickly than it usually does because everything was dry and smaller in size. I also fanned the flames fairly often during the first hour to really get the temperature up. I hadn't been satisfied with the results I'd been getting the last several times and grew more convinced it had to do with temperature. I'm not sure how hot the fire became, but it was much hotter than usual. Because the fire burned hotter, it consumed all of the fuel more quickly which meant it cooled down more quickly. Rather than the usual six or seven hours, this firing took only four hours from set up to pulling the pots out with oven mitts. There are several things I noticed about the results from this pit firing. Probably the most important is that higher temperatures seem to have a profound effect on the surface decoration of the pots. More color gets on the pots and the colors are deeper, more saturated. Color also seems to be driven farther into the pot so you get a layered look, almost three dimensional. If you look at the closeups below I think you can see what I mean. Instead of the color sitting on the surface, both the colors and the spots seem to be at different levels. All of these marks and color also seem softer at the edges and often will bleed into each other. You see more interesting shapes, and shapes within shapes as your eye moves across the pot. And I like having large areas that are lighter in color. I think it provides a more dramatic contrast than if everything is covered in peaches and burgundies. In short, everything seems more complex and I think that's a good thing.
I just completed my second firing at home. This time I used smaller pieces of kiawe that I bought at Safeway, a local grocery store, in order to get the fire started more quickly. Everything else was the same. It still took longer to get the fire started than I thought it should so I'm going to see if I can find small pieces of pine rather than hardwoods like kiawe that will burn more quickly.
I tried to make this firing as hot as I could, not at the very beginning of course, but as the fire became progressively hotter and the pots had time to heat up. I used a large box that was flattened that seemed to work well for fanning the flames. At one point I probably went a little too far and I heard a distinct pop and noticed a long crack running along the base of one of the pots. I guess it's really not watertight now! After about 3 or 4 hours, when the pots were almost done, it started raining and I decided to get the pots out of the fire pit. I use two long sturdy dowels to get the pots out by inserting one inside and using the other to steady it. I've had much greater success with this than with using raku tongs. I've seen too many people break the rims of their pots when inserting the tongs inside, and I haven't been able to get some pots out at all if they were too big around and had mouths that were too small. When I removed them from the pit, I rubbed ash on the smallest pot which made marks on it from the carbon that did not wash off (see photos). One of the pots was in the rain for a moment before I moved it inside and the raindrops made permanent marks on it (see photos).
I learned a great deal from this firing. Two of the three pieces were refired because I had been dissatisfied with how they had turned out when I fired them at Steve Martin's place about a month or so ago. The first firing didn't get hot enough and the pots turned out very dark, mostly a smoke firing. In this second firing, most of the carbon from the first firing seems to have burned off but not all of it. If I'm looking at this correctly, most of the color from the first firing seems to have remained on the pots, especially the reds. The second firing just added more color and more depth. I checked this with another pot that had been pit fired at Steve's that I put into a bisque firing (cone 06- 1828 F) in preparation for a regular glaze firing. All of the carbon burned off, but the reds from copper remained. It should be noted that this pot had not been coated with terra sig, so I'm still not sure if any color would remain on a pot with terra sig.
One of the pots that was refired had a texture created with a blue Mason stain slip with sodium silicate in it. I didn't put terra sig on it just to see what would happen. My impression after this second firing is that it absorbed an enormous amount of copper so it had more red on the pot than I usually get. I'm guessing that the more porous surface of the pot was able to absorb more from the fire. At the same time, the color is dry and doesn't appeal to me at all. The color doesn't have any depth and it's completely missing all of the little black spots that I love so much.
I spoke with a few potters since then about how they pit fire, and I received some advice that I'll try. One potter brought up an interesting issue. He said that he always uses a hole in the ground at his house when pit firing and encouraged me to do the same. He said that you need the ground to provide insulation so more heat would be retained and so the pots would cool more slowly when you were done. That made me think alot about what's happening in pit firing and how that might contrast with a cone 10 glaze firing. One of the most important concepts in glaze firing is the whole idea of "heat work." Heat work is the necessary combination of time and temperature when firing ceramics. If you throw a turkey into a 350 degree oven, you don't expect it to be 350 degrees in 5 minutes. Turkey is a poor conductor of heat so you might leave it in the oven for 3 or 4 hours until its internal temperature gets to around half that amount. Heat work is important for both clay bodies and glazes. It takes time for bodies and glazes to absorb heat and to vitrify or melt no matter how hot the kiln might be. But does this apply in the same way to pit firing? Since we're not using glazes, it certainly doesn't in some senses. But I've noticed that higher temperatures seem to volatilize colorants better and drive the color deeper into the pot, so heat is certainly important. Clay bodies also must be tolerant of thermal shock because temperatures are rising quite rapidly and they can fall precipitously is you pull pots from the pit fire when they're still really hot. I've done this many times and the only times I've had problems with this were with bowls. I have to keep bowls in the pit until they're completely cool or they will crack. My bowls, at least, can't withstand the stresses of being pulled out of the fire and placed on a piece of wood or concrete or metal. I'm intrigued by one thing, however, and that's the notion that pit fires can get much hotter if they have greater insulation. One potter claimed that his pit fires would get up to cone 06 (1828 F). I didn't ask how he verified that, but I should. I've never seen anyone using a pyrometer to measure how hot a particular pit firing gets, but I'm sure it's been done and could be done by me. Still, it's intriguing to think of what might happen at temperatures that high. Most books I read state that pit fires get up to around 1500 F at the most. Terra sig is also supposed to lose its sheen at temperatures that high. I'm also wondering how quickly color is added to a pot and how long a firing has to be sustained at a high temperature in order to get good color on a pot using this technique. In other words, does heat work play only a minor role in pit firing or does it potentially have more to contribute? Related to this, I'm interested in trying some saggar firing in our kiln to see what higher temperatures over longer periods of time might do using the same colorants. Maybe I'll try putting fire bricks around my pit or some type of ceramic fiber insulation. I can't dig a hole at the house where I'm renting, but maybe I could try it at Steve's place the next time we fire. And bring a pyrometer, of course!




 RSS Feed