Jon Rawlings Pottery
  • HOME
  • How I Caught the Clay Bug
  • Gallery
    • Feb, 2012 - Feb, 2014
    • Mar, 2014 - Oct, 2014
    • Nov, 2014 - August 2016
    • Sept. 2016 -
  • Resources
  • Blog
  • Art Museums
    • Oriental Institute, Chicago
    • Art Institute of Chicago
    • Honolulu Museum of Art >
      • Chinese Ceramics
      • Japanese Ceramics
      • Korean Ceramics
      • Native American Ceramics
      • Islamic Ceramics
      • Contemporary Studio Ceramics
      • Other Ceramics
    • Hawaii State Art Museum
  • Contact Me

Black and Brown Stoneware

8/24/2013

2 Comments

 
Black and brown stoneware clays are available from several distributors under different names. The ones I've worked with are Dark Brown from Laguna and Black Mountain and Jamaica from Aardvark. I've worked more with Black Mountain than any other black or brown clay, so I decided to call Aardvark on Thursday, August 22, to speak with someone there about dark stoneware. The person they referred me to was Steve Davis. As you would expect, Steve couldn't share precise formulas with me since that information is proprietary, but he could give me the basic formula to help me (and you) understand more about formulating dark clay bodies. He explained that most stoneware clays are made up of about 70% clay, mostly fire clays, ball clays, some red clays, and maybe some kaolin. Dark stoneware clays are mostly fire clay, ball clay, and a larger proportion of red clay.

Here's the general formula for black and brown stoneware:
Fire clays            30%
Ball clays           20%
Red clays           25% (if the red clay goes down, the feldspar can go up)
Feldspars            10%  
Sands or grogs    15%

Silica can be added to adjust glaze fit (reduce crazing) and glass can be added to lower water absorption. Different proportions of iron and manganese are also added. The black color of Black Mountain, for instance, is largely due to added manganese dioxide. 

If you're wondering, the proprietary information that Steve couldn't share included both precise proportions that go into any particular clay, and the exact types of clays, feldspars, sands, etc, that are used. Black Mountain, Jamaica, and Dark Brown are all different in composition, but the differences are minor.

On the wheel, I've found that Black Mountain, Jamaica, and Dark Brown are very similar in their throwing characteristics. I love working with all three because they're smooth and relatively plastic. Aardvark also offers a version of Black Mountain for handbuilders that has more "tooth." 

When I first started working with Black Mountain, I had quite a bit of trouble with my bowls cracking, especially at the rim. That's because I dried the bowls too quickly and made the rims too thin. I knew that my pots were going to shrink as they lost water. They would shrink as they became greenware, shrink some more as they became bisque ware, and shrink even more as they became finished ware in the glaze kiln. Total shrinkage could vary from 10 to 15% depending on the clay, but it took me awhile to figure out how the loss of physical and chemical water might put stress on the structure of my pots, especially if water was moving out of the clay unevenly. I figured that the only wrong way to dry a bowl was to put it out in the sun for long periods of time, so I never did. But I would leave the bowl sitting on a shelf without any covering. A large bowl in a warm place like Hawaii drys in about 3 days, but this drying "method" put too much stress on the structure of the clay. The area near the rim was drying (and shrinking) more quickly than the clay lower in the bowl. Because the clay wasn't shrinking evenly, stress cracks developed that weren't revealed until the glaze firing when the clay would shrink more severely and the cracks opened up. I have several pieces in the gallery that have these cracks beginning in the rim, and there are many more that I could have shown. Now I'm especially careful not to make my rims too thin and to loosely cover the bowl with plastic about an hour after I've shaped it on the wheel. By then it's had time to harden slightly and can take the weight of the plastic without distorting or the plastic sticking and marring the surface. The goal is to promote even drying all the way up and down the pot. I never want to see a very light color at the top of the pot where it's dry and a very dark color at the bottom where it's still moist. Usually it takes about 7 or 8 days before the bowl is thoroughly dry and can be bisqued. Steve Davis also recommended flipping the bowl upside down as soon as possible in order to promote more even drying. When the bowl is firm enough, cut it off the bat, lay another bat on top of the rim and then flip it over. After trimming, keep it upside down until it's completely dry. When a bowl is upside down, the foot will dry at a rate more nearly equal to the wall and the rim. I've also found that by drying it upside down, it helps to keep the rim level. If for some reason I don't want to dry the bowl upside down, I'll lay a clean bat on top of my trimmed bowl, lightly tap the bat in the middle until the bat is lying flat on the rim all the way around, and keep the bat in place until the bowl is completely dry. Some of my first large bowls had pretty wonky rims, but using these techniques (drying upside down or with a bat lying on top) have helped my bowls to have level rims. For more information about issues such as drying and cracking, look at the articles in The Potter's Dictionary (Hamer) on "Crack" and "Dunting."

Like any other clay body, some glazes work well with dark clays and some don't work well at all. Take a look at my gallery to see how different glazes work with dark clays. A lot of this is simple trial and error and keeping an eye out for discoveries that your fellow potters make. For instance, I always look at everything that comes out of the glaze kiln. If I see something special and I'm not sure what glaze(s) the potter used, I'll leave a note on the piece asking them what clay body and glaze(s) they used. Within a week, I'll have a note on my shelf explaining what they used. I've never had someone tell me it was a "secret," and I've learned a tremendous amount from my fellow potters by gleaning from their experience. And I always return the favor to anyone who asks. Let me share a few things in general that I've learned about glazing dark clays. First, some glazes do not work well on dark clay because the glaze turns black or very dark brown no matter how thickly you apply it. Second, some glazes will be black if you apply one coat but will look great if you add a second coat. The only way to tell is to "try see" as they say in Hawaii. Third, I've had good results with glazes that contain rutile, and Steve Davis also mentioned that glazes with rutile will often look great on dark clays. Fourth, one of our potters at HPG found that celadons look absolutely terrific, especially inside bowls, when the glaze is thick enough. I've begun using a technique I picked up from Tichane's book on Celadon Blues, pouring one celadon glaze into the bowl and applying it thickly, and then spraying a different celadon glaze lightly on top. Often I'll use a blue celadon for one layer and a green celadon for the other. To add more interest to the piece, I'll use a rutile glaze as an accent. The only downside is that the glaze tends to craze when it's this thick, so only use this technique on decorative pieces. Fifth, white glazes, including shinos, look good. I especially like pouring a white stoneware slip like B-Mix over the pot when it's leatherhard and then pouring shino over it after it's been bisqued. The shino is white where it falls on the B-Mix but becomes a dark orange where it falls directly on the dark clay. Sixth, dark clay responds well to soda firing. I especially like using the technique I mentioned under number 5 above with a Bix-Mix slip and shino, and I've also had very good results by using just a slip made from B-Mix Woodfire. The slip flashes an orange/peach color and the soda leaves a clear finish with an orange peel texture on the clay itself. If you want to see soda-fired pots that have slips, shinos, and wood ash on dark clay, look at Lisa Hammond's pots under google images (www.images.google.com). Seventh, pots with texture look terrific when the dark body is visible where the glaze is thin. Eighth, dark clay looks great all by itself, and I like to make pieces that highlight the clay. For instance, I have several bowls in the gallery that are only glazed on the inside so I can highlight the handsome clay on the outside.

Finally, let me mention something Steve Davis emphasized and it's the need to properly bisque  your pots. He has an article on the Aardvark web site that's entitled "An Oxidized Bisque Firing." He wrote the article quite a few years ago but updated it just a few weeks ago. After years of experience he's suggesting a different schedule for bisquing in order to get complete burnout of both organic and inorganic carbon. If both of these are not burned out in the bisque firing, there may be bloating, black coring, pin holing, blisters, and poor color development in the glaze firing. This can be especially problematic when working with dark clay bodies that have a high percentage of iron. To find his article, go to www.ardvarkclay.com. Look on the left side for "Technical Information" under "Resources." The second article under "Technical Information" is "Bisque Firing" which will take you to his article. By the way, if you want more info about clay and firing, Steve is a great man to talk to. He also has an interesting site (www.kazegamas.com) where he explains how he developed a small mobile kiln that achieves wood fired results in only six hours. If you don't live in the great outdoors, check out his web site. The kazegama kiln looks like a great alternative to wood firing when you live in the city.
2 Comments

Workshop with Julia Galloway

8/21/2013

1 Comment

 
Picture
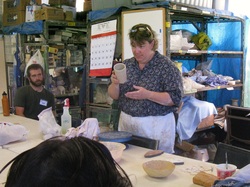
Okay, I said the next blog would be about dark clay bodies, but I had a workshop with Julia Galloway this past weekend so I'm going to talk about that first. Julia is an administrator/professor at the University of Montana and a first-rate potter. Julia's workshop focused on surface decoration, something I haven't given enough attention to. On the first day we threw or handbuilt different types of pots. Here's Julia showing the class her technique for making a flange. She makes the flange early and then pulls up the walls below it. That way she has enough clay to make an adequate flange. If she waits until the walls are pulled up all the way, she may not have enough clay at the top to make a good flange. She worked while standing up to protect her back, but it was pretty rough getting her foot up to that pedal! (Just kidding, of course) I learned a great deal from her about a number of things such as how to center small pieces of clay. Some of you have large hands like mine and may have a harder time centering smaller pieces of clay than you do larger pieces of clay. If I'm correctly interpreting what she was doing, she had a sponge in her right hand, cupped her hands around the clay on both sides and pulled it back toward her while controlling the top with both thumbs. Anyway, that's what I've been doing since then and it's helped me center small pieces of clay more quickly. While Julia was doing her demo's she was sharing very funny and insightful stories about her journey as an artist. 

Picture
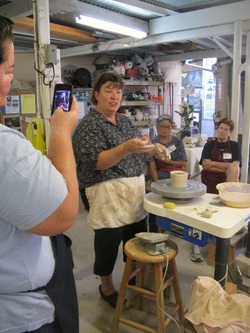
On the second day, Julia was helping us decorate our pots by showing us different techniques she's mastered such as incising, sgraffito, and shellac resist. With each technique, she was using colored slips to add depth to the surface of her pots. Julia is also interested in the history of pottery, and gave us an interesting presentation (along with images) about how decorations work on pots, what they actually do. For instance, one decoration may move our eyes around a vase, another takes us into the center of a bowl, still another takes us up and over the spout. Some decorations express something about the pot's function. For instance, a Chinese pot that served as a sort of aquarium would have fish and aquatic plants on the side. Many of the most effective decorations create graphic tension which increases its visual interest. Julia continued to be informative and funny throughout the day, but the second photo shows a bit of her intensity. She's a great teacher, and great teachers know how to shift from being funny and light-hearted to looking straight at their students to see if what they're saying is getting through their thick noggins! I think a great deal got through ours, judging from my own experience and the experience of other participants.

Picture
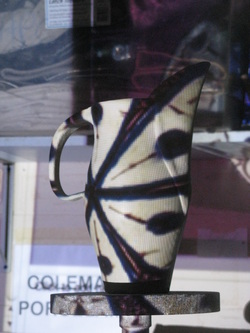
Finally, Julia set up a stand and had each of us put one of our undecorated pots on the stand. She projected images of decorations from historical pots on to our pots in order to get us thinking about different ways we could decorate them. I'd never seen this done before, but it's a great way to get the creative juices flowing. Some of the decorations worked better on my pitcher than others, and the image to the left captures one of the better design ideas. So if you're looking for a workshop leader, consider inviting Julia. She's an amazing potter and a great teacher. If you'd like to find out more about her work, visit her website at www.juliagalloway.com. There you'll find things like a gallery of her work, a section called "alchemy" (which includes her favorite recipes for glazes and slips), and her "field guide" which is a real gem. The field guide is intended for young potters who are graduating from college and helping to orient them to professional potting, but it's also useful for those of us who aren't full-time potters. You'll find a great deal of information about things like taking images of your pieces, setting up a website (I need to read this one!), and packing and shipping your pieces. One section includes short interviews with important potters like Tony Marsh and Richard Notkin. The last section has a gold mine of pdf downloads. I've had a great deal of fun looking through this stuff. Check it out and let me (and Julia) know what you think.

1 Comment

Using different types of clay

8/13/2013

1 Comment

 
I enjoy working with different types of clay. The first clay I tried was B-Mix with grog. I don't know exactly why I chose that one. Maybe I saw all the other beginners choosing Soldate 60 and decided to try something different. I remember thinking it felt coarse like sandpaper which is funny to me now since I think it feels relatively smooth compared to other clays. Over the next several blogs, I'll discuss different types of clay bodies and share some of my experiences with each one. I know that potters are working with clay from many sources, so the names of these clays probably won't mean much to most of you. But I also think most of you are using stoneware and porcelain clays that are similar in composition so you may still find my discussion useful. As a side note, let me mention that I've heard and read several Europeans and Japanese complain about the lack of plasticity in North American clay bodies and how grateful they are to have better clay bodies to use in their own countries. I suppose this is based on their experience of both, but I can't speak to that since I've only used clay from North American sources, namely Laguna and Aardvark. It does make me curious, however, and I hope someday to try clay bodies from other parts of the world to compare them to my own. But for now, clay from Laguna and Aardvark is all I have to work with. In the next blog, I'll begin my discussion of different types of clay with three very dark stoneware clays: Black Mountain, Jamaica, and Dark Brown.
1 Comment

On Not Getting Into the Show

8/12/2013

0 Comments

 
I'd mentioned in an earlier blog that I was preparing to submit some of my pots to a juried show sponsored by the Honolulu Japanese Chamber of Commerce. The last day to submit was August 7th and the deadline was 4:00 pm. Well, I got crazy busy and didn't get over there until 3:55. I thought I'd be the last person through the door, but when I arrived at Linekona I felt like I'd joined a herd of wildebeests. There were people everywhere carrying in paintings, glass, sculpture and pottery. There were some amazing things coming in, and it kept coming in until well past 4:30 when I left. Forget about the deadline when you have all of that great stuff rolling in! I saw one of my friends, Emily, bringing in a huge handbuilt pot. It was in two pieces and she needed another guy to carry one of the pieces for her. It was impressive, and I knew she'd worked hard on it. Everyone was smiling, greeting each other, complimenting each other's work. Judging would be that night, and the results would be posted on the website by the following afternoon. I'd submitted two of my better pieces but I knew it was a longshot. When the list came out the next afternoon, I wasn't on it. Emily wasn't either. In fact, not one of my friends who submitted work had made it into the show. I didn't feel sad for myself. I use these shows as focal points to try new ideas and techniques. They give me a time constraint within which to produce something special, and I need that kind of pressure. The next juried show is the Hawaii Craftsmen show in October at the Honolulu Museum of Art. This is tough to get into as well, but at least I won't be competing with painters and sculptors. I'm already gearing up for the show by drawing sketches for all kinds of pots and playing with different ideas for glazing. By the way, when I came back on Friday to pick up my pieces, I couldn't help laughing to myself when I saw so many others carrying paintings and pottery back to their cars. I could imagine how carefully they'd placed their piece in the car before bringing it to Linekona, babying it, making sure it wouldn't jostle about, carrying it slowly into the building for all to see. Now they were acting like bank robbers, hustling into the building and moments later rushing out with the rejected piece under their arm, furtively glancing from side to side while tossing it in the back seat like an old duffle bag, making their getaway before anyone could see them. Maybe while watching this scene unfold I was experiencing a little schadenfreude or just the satisfaction you get from mutual failure. All of us knew we were taking home pieces that we thought were winners but had betrayed us by losing. How different Wednesday had been when I brought my pots to the show. Everyone sitting at the table was so complimentary as they accepted my entry fee. At least my check was a winner! When I picked up my pieces on Friday, they acted like I'd forgotten to take out the trash. As I walked out the door, they looked at me sideways as if to say, "What's that junk still doing here? Get it out! Get it out now! I don't even want to see it in my peripheral!" Emily was picking up her big pot, only this time she wasn't smiling. I think she felt a little bad after all her hard work, and I felt badly for her. But that's the way it is with these shows. I mean, the only ones I saw on the list who had pots in the show were my teachers! I was competing with my teachers!!!
0 Comments

Thoughts on centering

8/2/2013

0 Comments

 
Lately I've been thinking quite a bit about something I heard Otto Heino say in a video. As it showed him centering a huge piece of clay, about 50 pounds, he commented that he always makes sure he centers his piece of clay all the way down to the wheelhead. At first that struck me as an obvious point. "Of course you center your clay all the way down to the wheelhead. What other kind of centering is there?" And then I realized there's at least one other kind of centering. Potters have been using it successfully for many years when they throw off the hump. When you throw off the hump, you only have to center more precisely the small lump that you're working on at the top of the hump. If you've thrown off the hump, you know that the very top of your piece of clay can be perfectly motionless even though the clay at the bottom of the hump is off center. When I thought about my own centering, especially of large pieces of clay, it made me realize that my centering was more like throwing off the hump. When I centered a large piece of clay, the top would be motionless so it looked like the whole lump of clay was centered but it was still off center at the very bottom, right at the wheelhead. As soon as I opened the hole my cylinder went off center because the hole went all the way down to the off center clay at the bottom. This made it more difficult to pull the walls, and almost impossible to shape the piece in the way I wanted. I don't know if some of you have noticed this or not, but if you find your clay going off center when you open the hole or if it feels wobbly when you start pulling up the walls, maybe it wasn't properly centered all the way down to the wheelhead. I think that's what Otto Heino was getting at, and it's helped to clear up quite a few problems I was having, especially working with larger pieces of clay.  
0 Comments

    Author

    I hope this blog will be encouraging to potters, especially beginning potters, and a source of helpful information and comment.

    Archives

    November 2021
    December 2019
    September 2019
    May 2019
    January 2019
    December 2018
    November 2018
    October 2018
    September 2018
    August 2018
    July 2018
    June 2018
    May 2018
    April 2018
    January 2018
    December 2017
    November 2017
    October 2017
    September 2017
    July 2017
    May 2017
    April 2017
    March 2017
    February 2017
    January 2017
    December 2016
    November 2016
    October 2016
    September 2016
    August 2016
    July 2016
    June 2016
    April 2016
    March 2016
    February 2016
    January 2016
    November 2015
    October 2015
    September 2015
    August 2015
    June 2015
    May 2015
    April 2015
    March 2015
    February 2015
    January 2015
    December 2014
    November 2014
    October 2014
    September 2014
    August 2014
    July 2014
    June 2014
    May 2014
    April 2014
    March 2014
    January 2014
    December 2013
    November 2013
    October 2013
    September 2013
    August 2013
    July 2013
    June 2013
    May 2013
    April 2013

    Categories

    All
    Amaco
    Black Mountain
    B-Mix With Grog
    Burnishing Pots
    Centering Clay
    Coleman Porcelain
    Empty Bowl Hawaii
    Fuming Pots
    Hawaii Potters Guild
    Ikebana Pots
    Juried Shows
    Making Pots Heavy Or Light
    Masonite Bats
    Mothers Day Pottery Sale
    Otto Heino
    Pit Fire
    Plastic Bats
    Porcelain Clay
    Pots And Plants Sale
    Soldate 60
    Stoneware Clay
    Terra Sig
    Throwing Clay Thick Or Thin

    RSS Feed

Proudly powered by Weebly