I just completed my second pit firing this past Saturday at Steve Martin's place in Kaneohe. The last one was in April of 2013 (see blog on April 30, 2013) and I had pit fired two pieces with good results. I had scheduled pit firings on two different days since then, but they were both rained out. I'm definitely hooked on this process and hope to be able to pit fire on a more regular basis. I also plan on experimenting with different forms (large bowls, for instance) and using different materials.
This time I tried a few ideas I learned from watching Sumi von Dassow's video on Pit Firing & Burnishing as well as her book Low-firing and Burnishing (part of the Ceramics Handbook series published by A & C Black and The American Ceramic Society). In the images that follow, I show each step I took in this firing and what the results were.
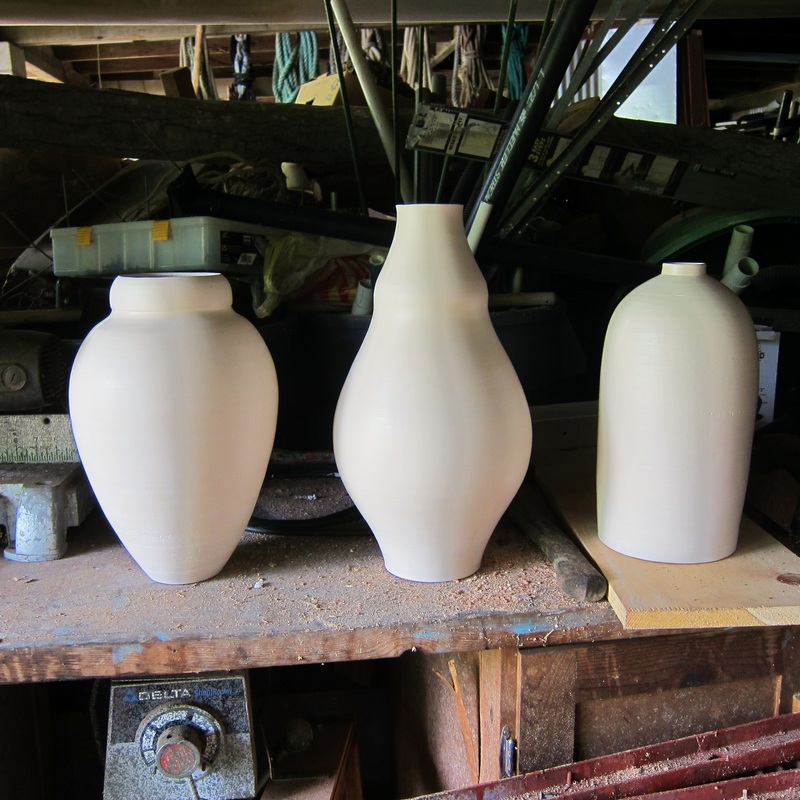
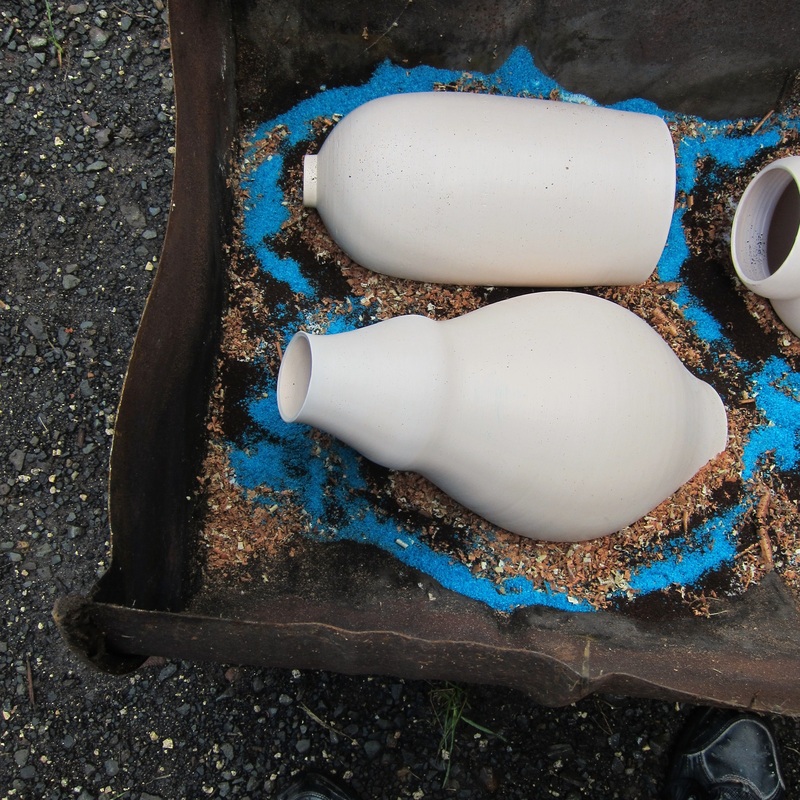
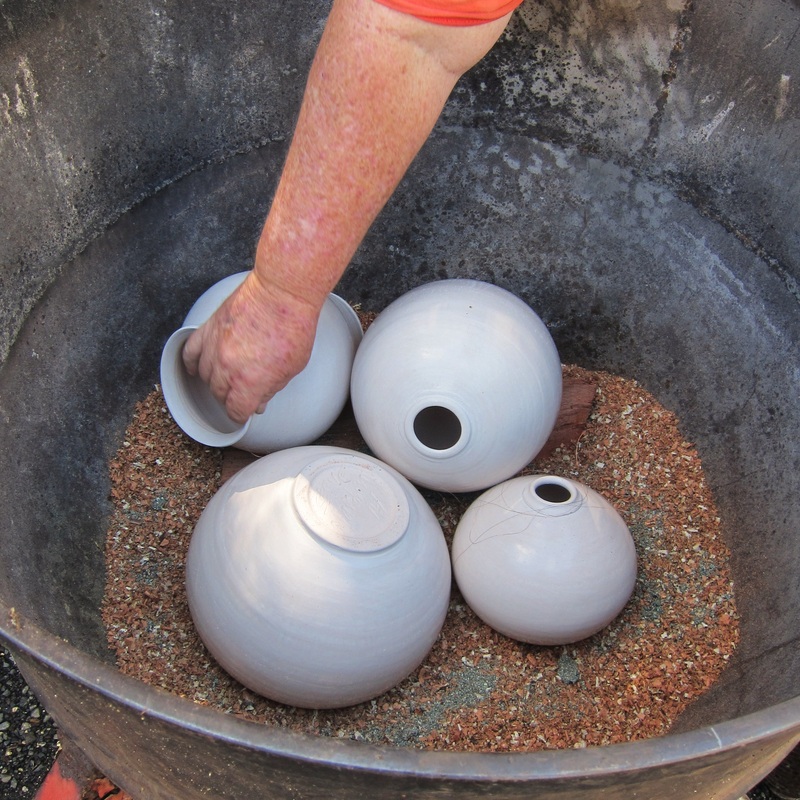
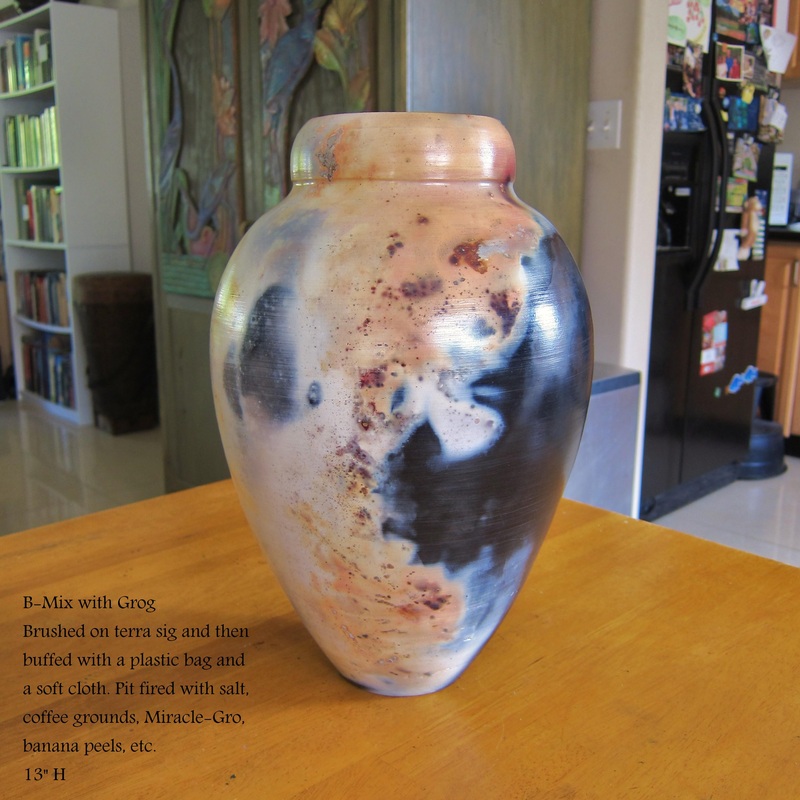
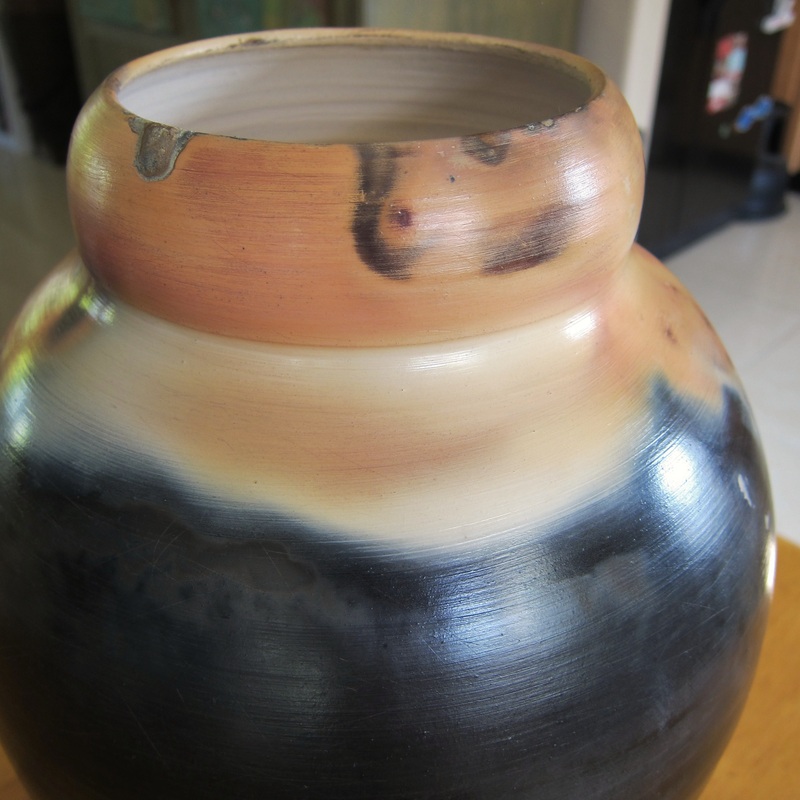
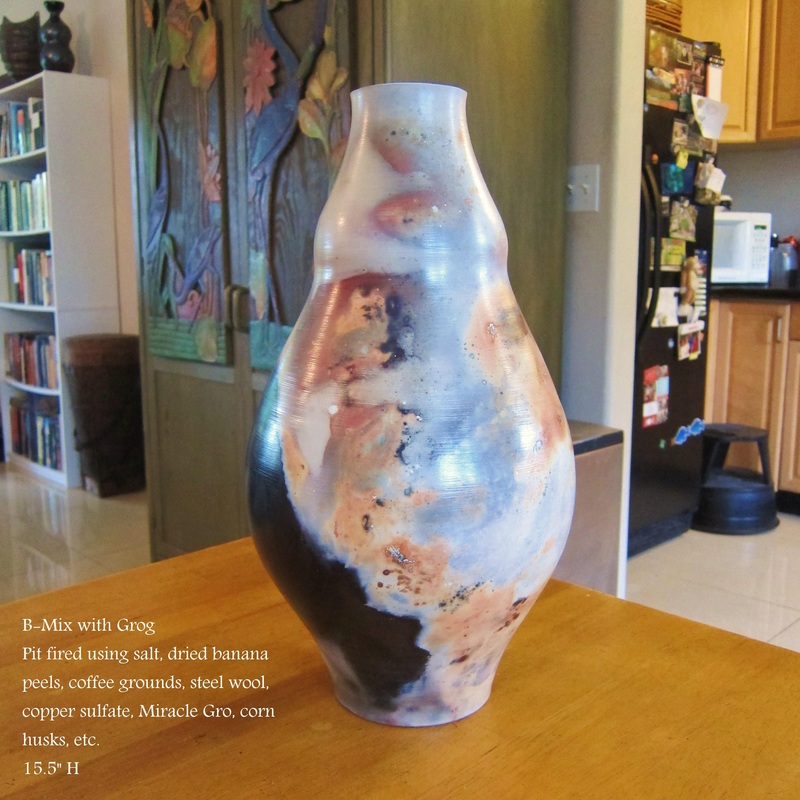
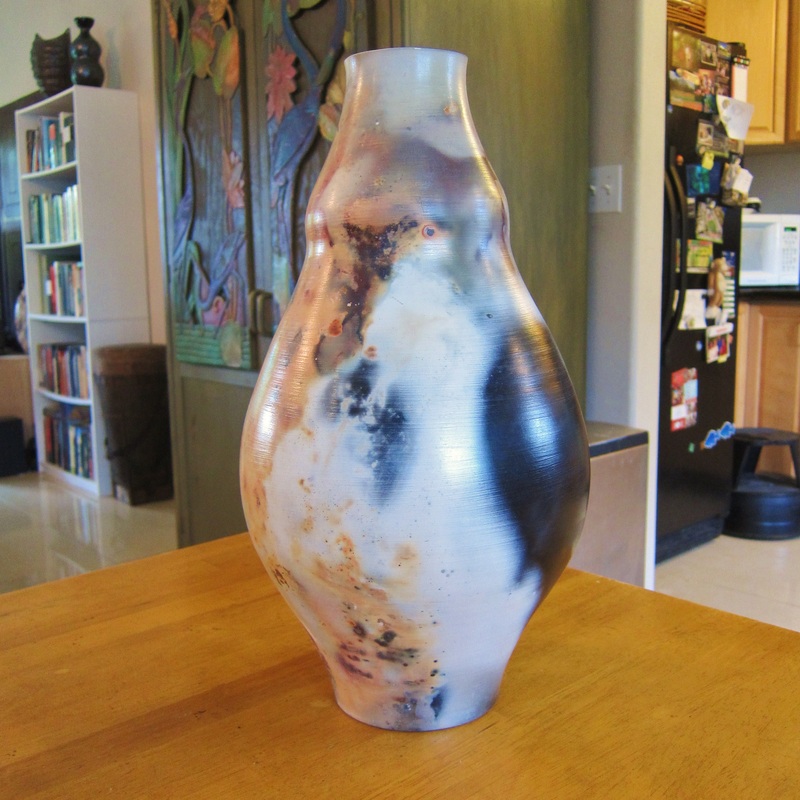
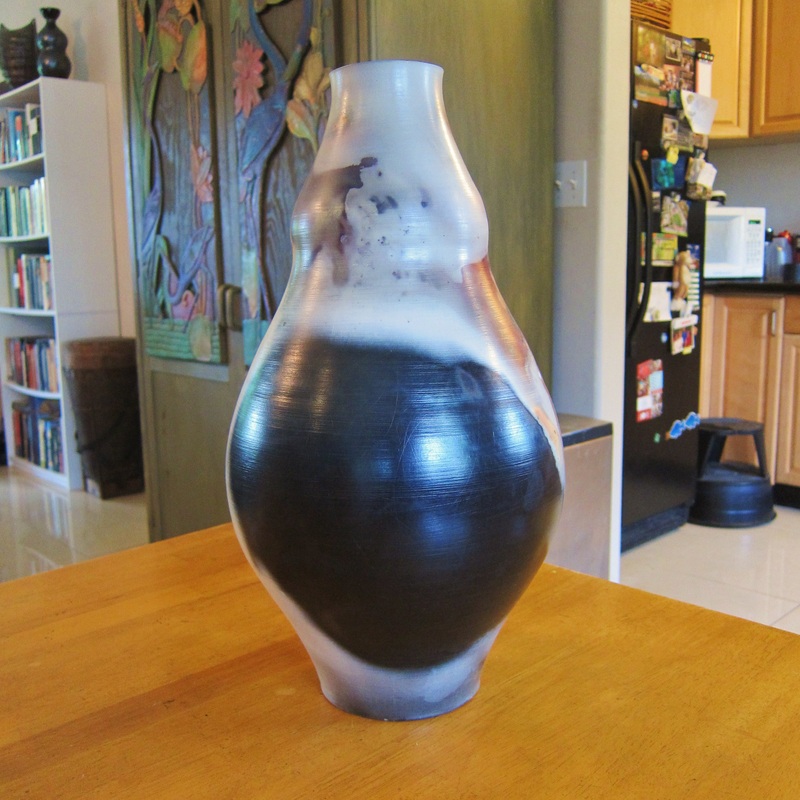
I fired 3 pieces and Steve fired 4. The clay I used was B-Mix with grog. I like the whiteness of the clay but I also like how the grog helps the pots to resist thermal shock. At least that's the theory. Steve uses Soldate 60 because he thinks it offers even more protection against thermal shock. Some authors write that clays with grog can't be burnished as well as clays without grog. I'll have to try something like plain B-Mix and see what happens. In my experience so far, however, I haven't had a problem with grog roughening the surface during buffing or burnishing because I smooth out the surface with a plastic rib as the last step in throwing a pot. Steve and I both use terra sig that we purchase from Jeff Chang, a local potter who makes it himself. Next time I plan on using my own terra sig and see how that goes. I brushed on the terra sig and used a plastic grocery bag and a soft cloth for buffing. I didn't burnish any of my pieces, but Steve burnished his using vegetable oil and a rock. His pots do have a deeper shine than mine, though mine come close once I apply wax after the firing. Both of us bisqued our pots to 018. The theory is that the lower the bisque, the more porous the pots will be and the more easily they will absorb carbon and other materials that are fumed. It also means the pots are more fragile and liable to break.
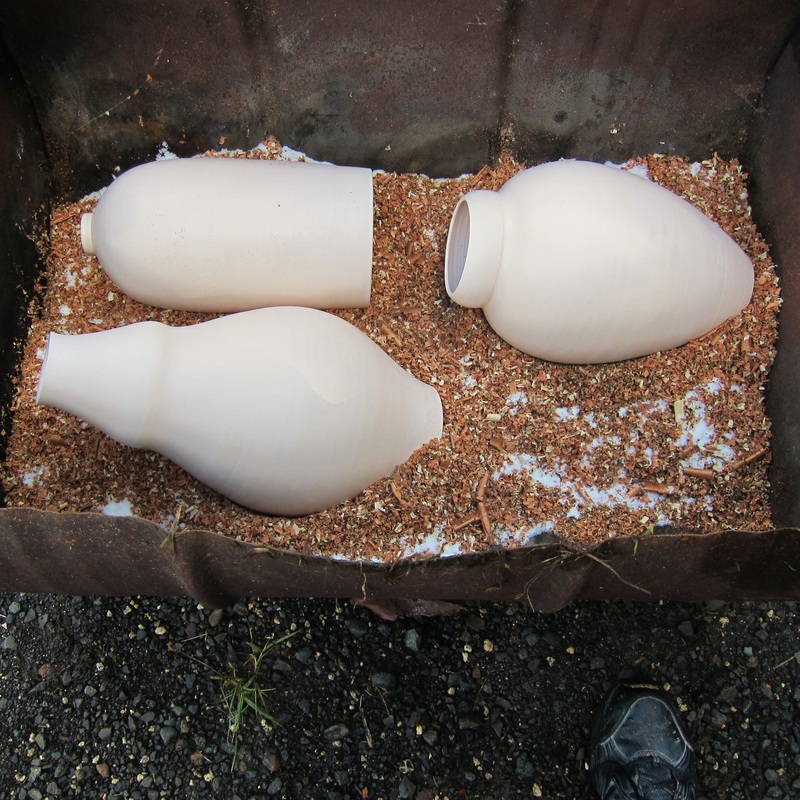
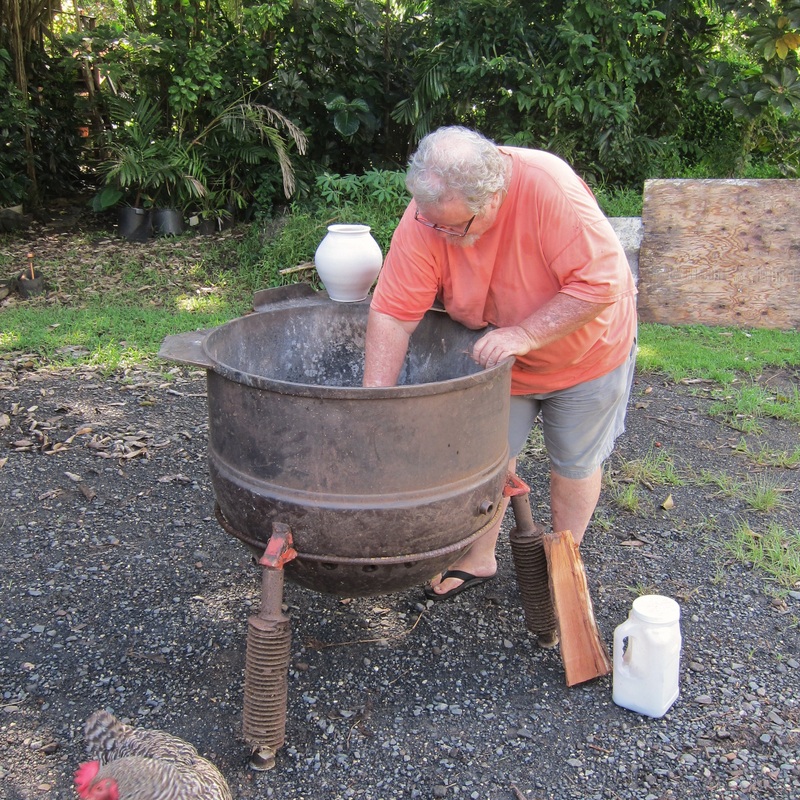
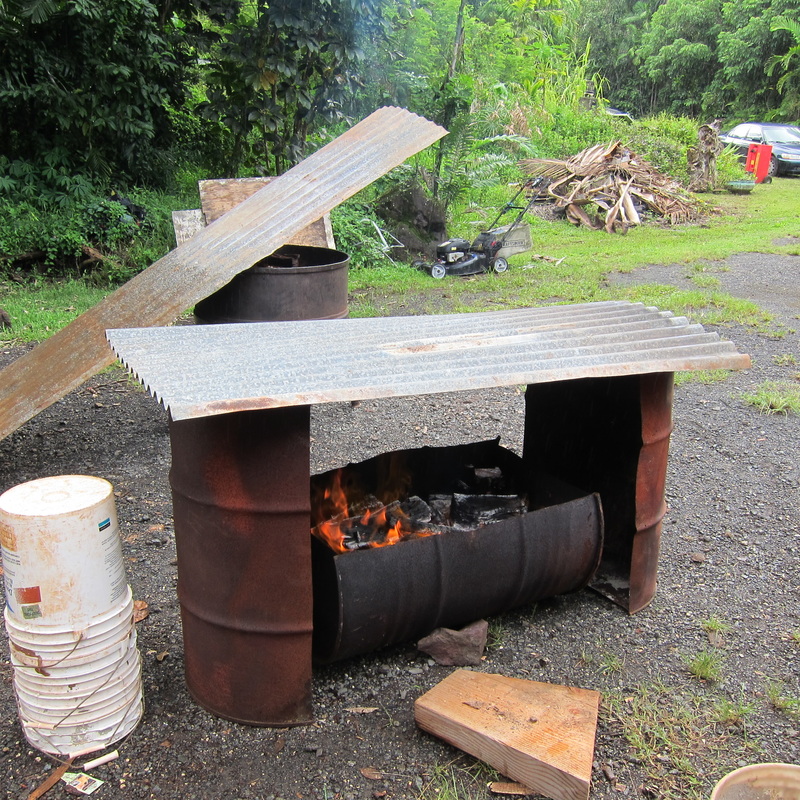
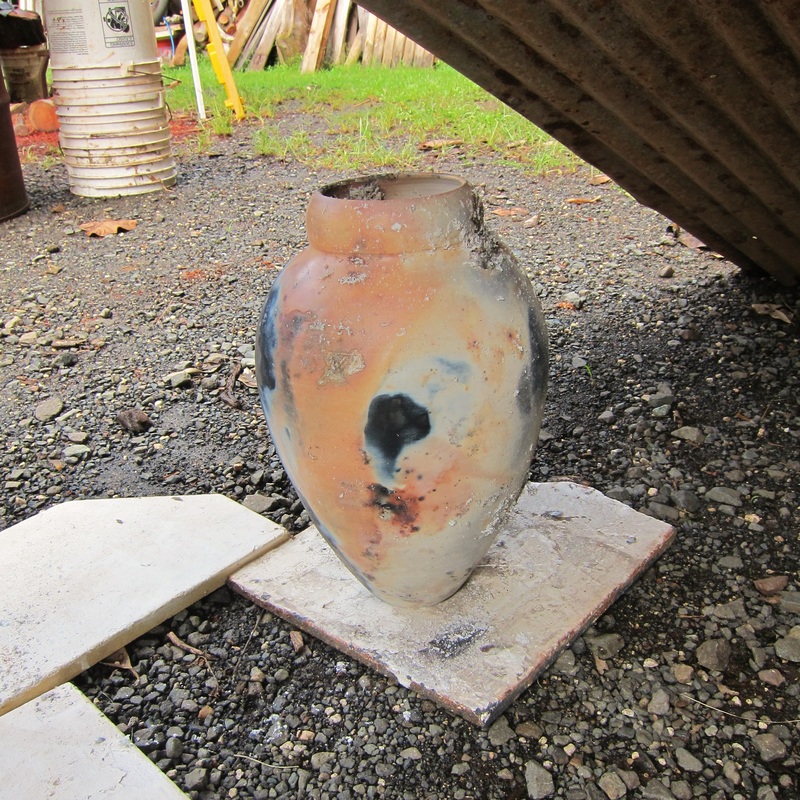
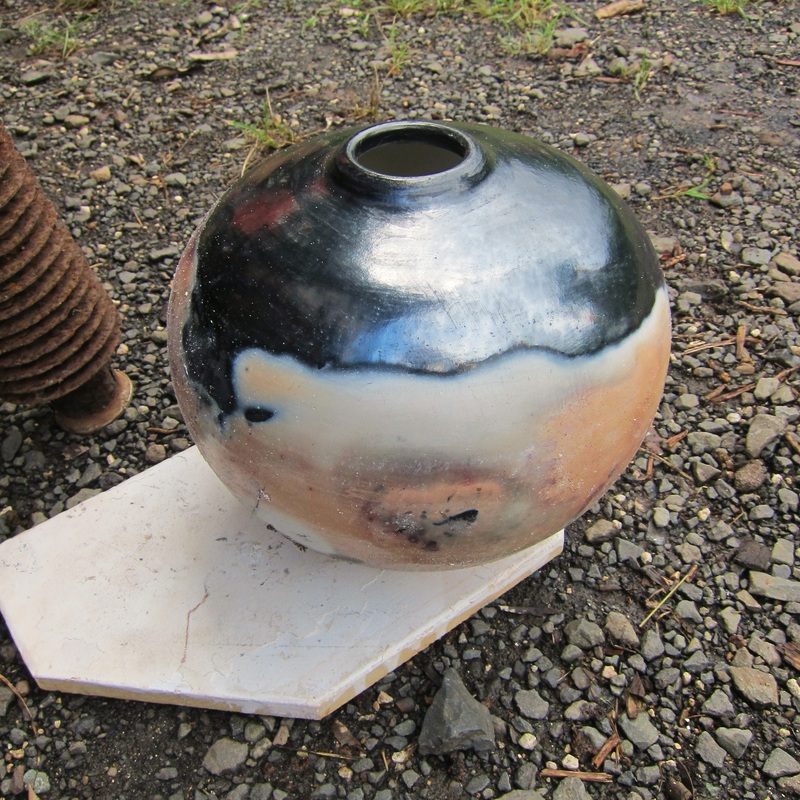
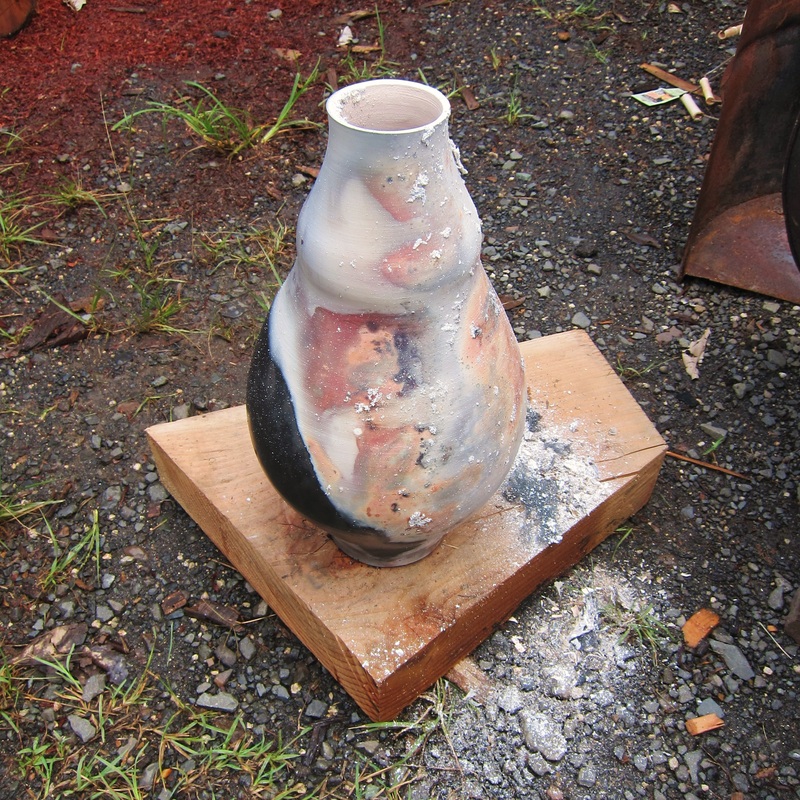
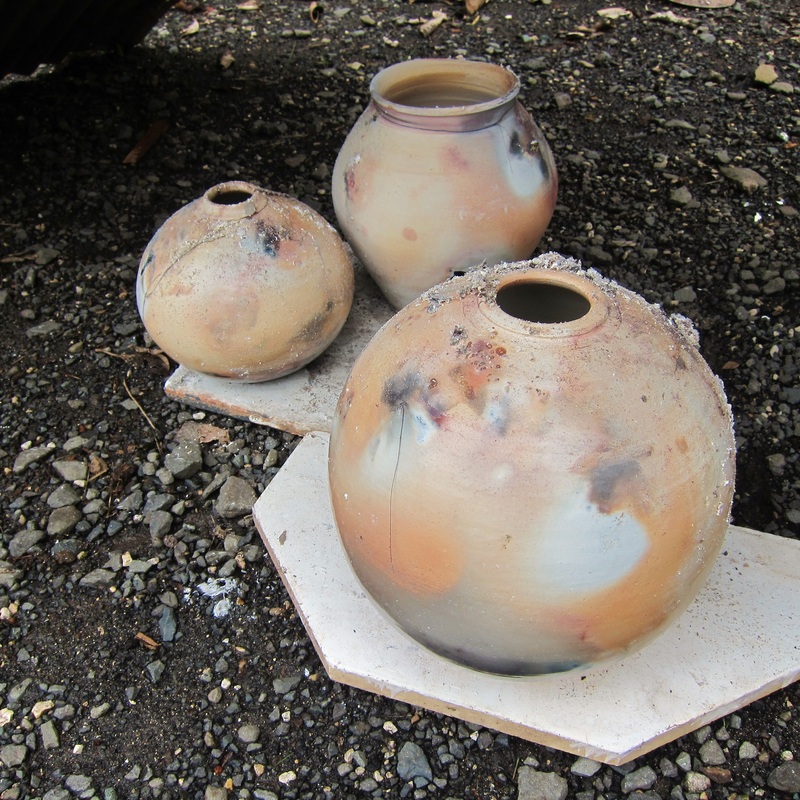
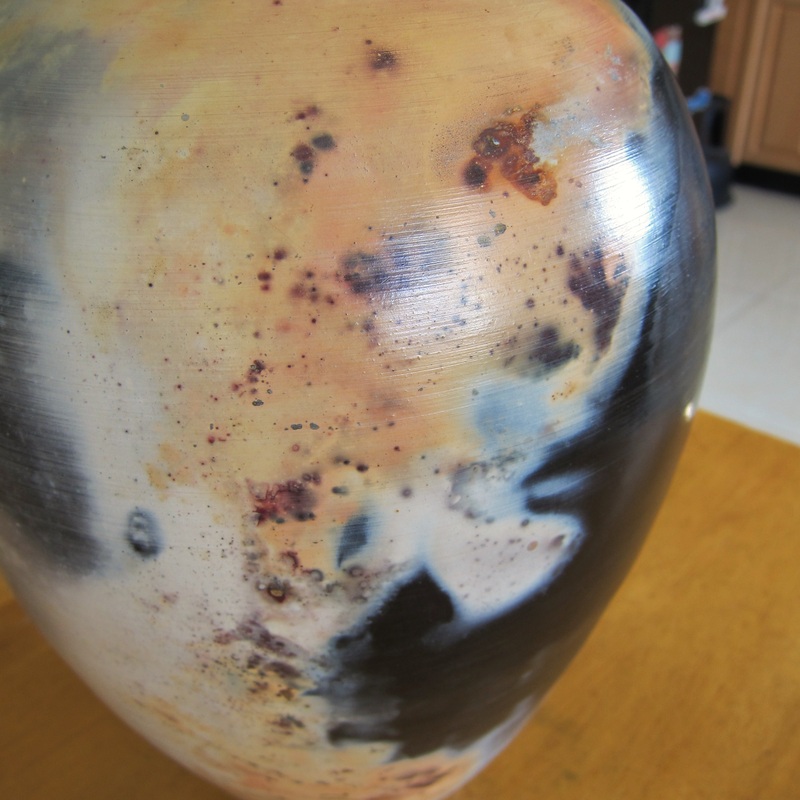
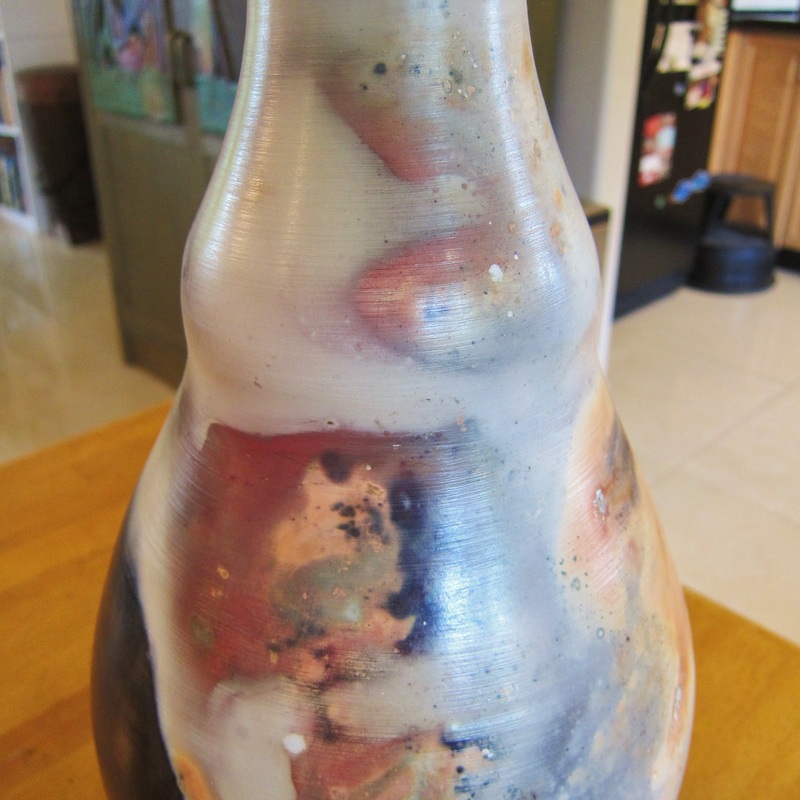
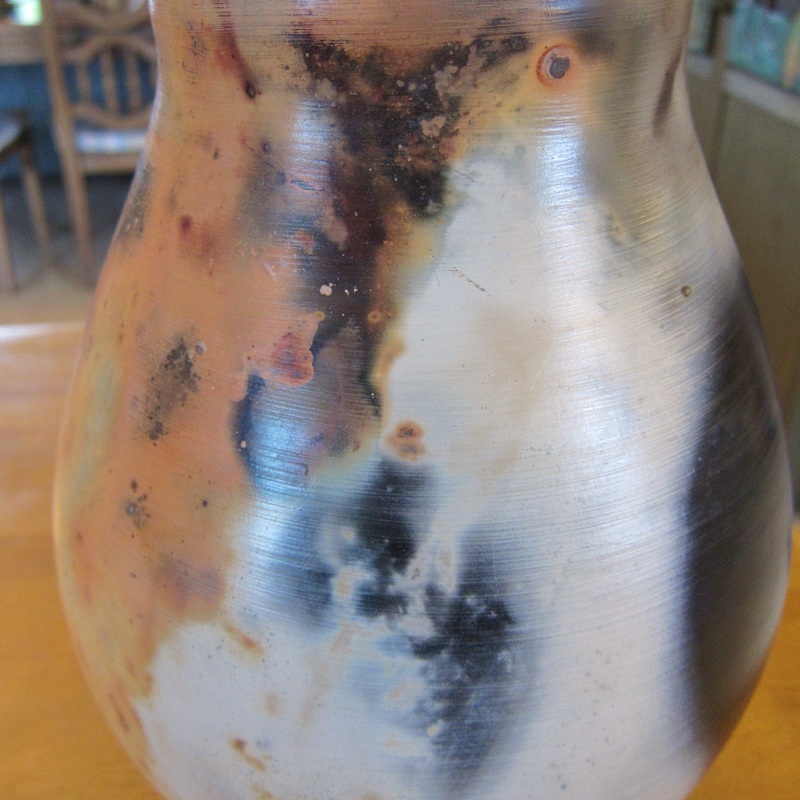
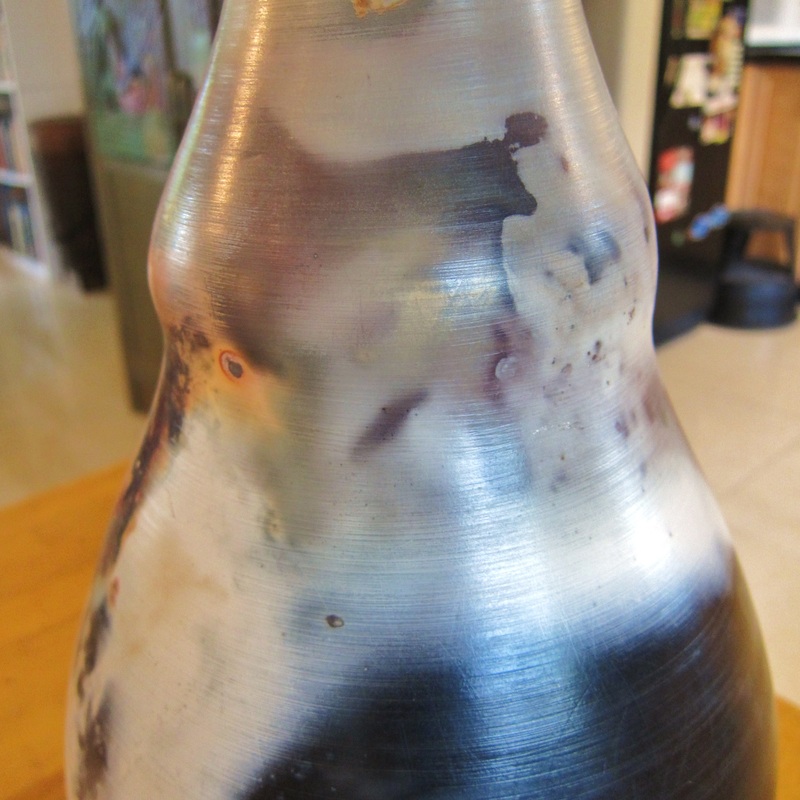
The pots were placed in two different containers, mine in a half barrel with fairly high walls and Steve's in an old kettle from the kitchen of a school cafeteria. Next time I'll try a barrel with lower walls to create more exposure to the wind. We placed fine wood shavings on the bottom and then laid our pots on them. Whatever part of the pot is lying in the shavings will be exposed to more carbon which will produce black surfaces on the pot. So I placed them in ways that would make black patches on some places and not on others. I also learned a nice trick the last time we pit fired. After positioning the pots on the wood shavings, I lightly mound some of the wood shavings on the sides of the pot. At first, these areas will turn black from the carbon in the wood shavings. As the shavings burn away, however, these areas will be directly exposed to the fire. If the fire is hot enough, it will burn most of the carbon away in those areas but leave a "halo," a dark outline with an inside that's whitish grey. If the carbon burns away when there's still material that's vaporizing around them, you may get some color from fuming. It gives the pot a kind of air-brushed look in those places. You can see some examples of this in the images below.
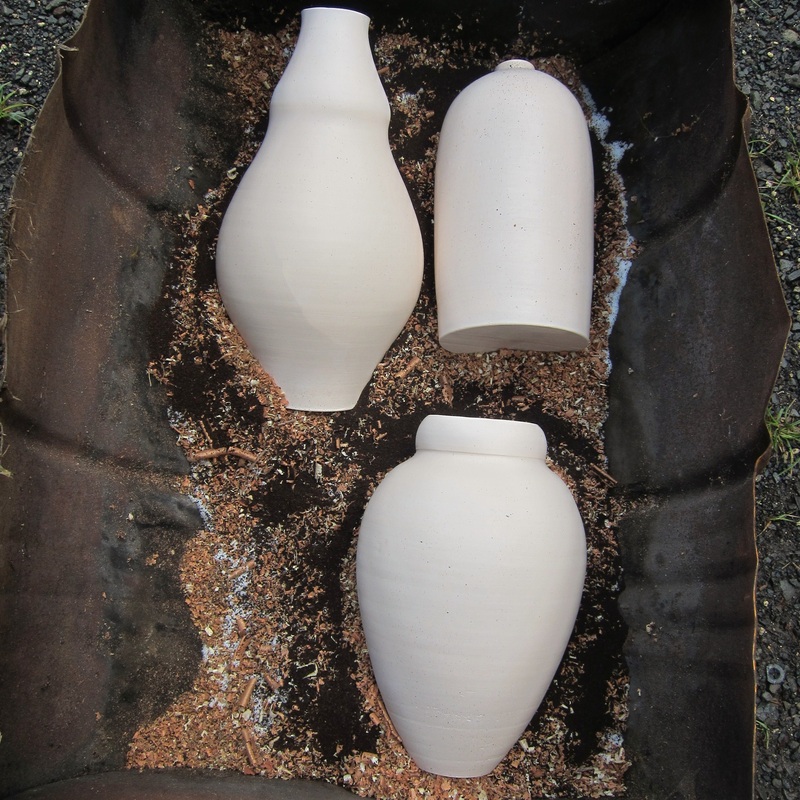
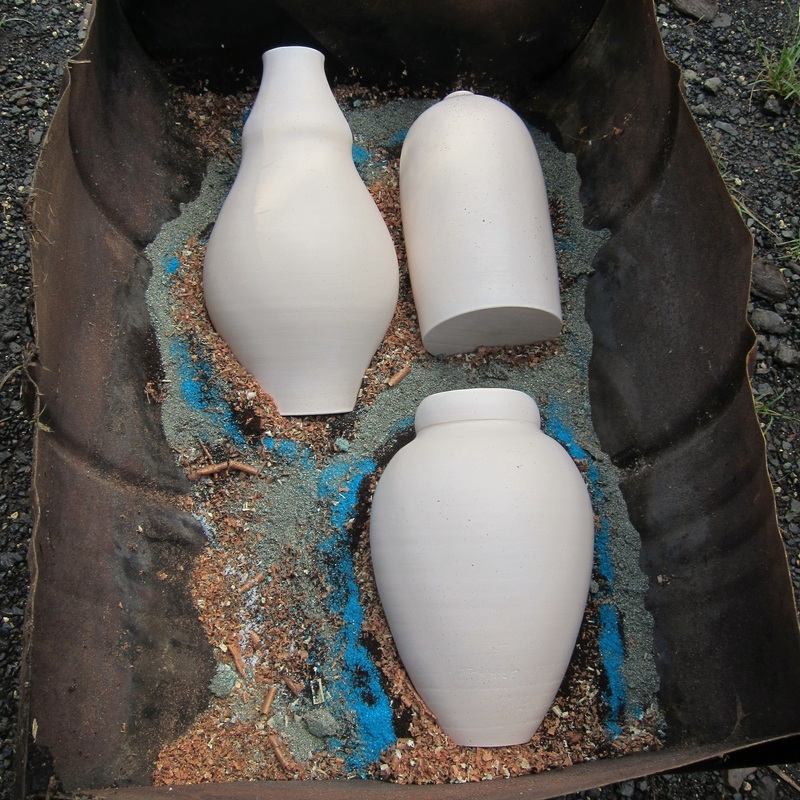
After the pots were positioned in the barrel, I began putting in different materials to act as colorants. I don't know if there's any particular order that's better than another, but this is the order I used for this firing. I would say in general, however, that when you're using chemical powders or salt, it's best not to throw them directly on the pot. If placed directly on the pot, they may leave dark crusty patches on the pot instead of fuming them. But if that's the effect you're looking for, then throw them on! Organic materials such as corn husks, banana peels, coffee grounds, and seaweed can be put directly on pots. However, they will have some effect such as shielding certain parts of the pot from other colorants (at least for awhile) and they also contain carbon that will mark pots as well. In other words, their effect is a complex one and complex in this case can be good.
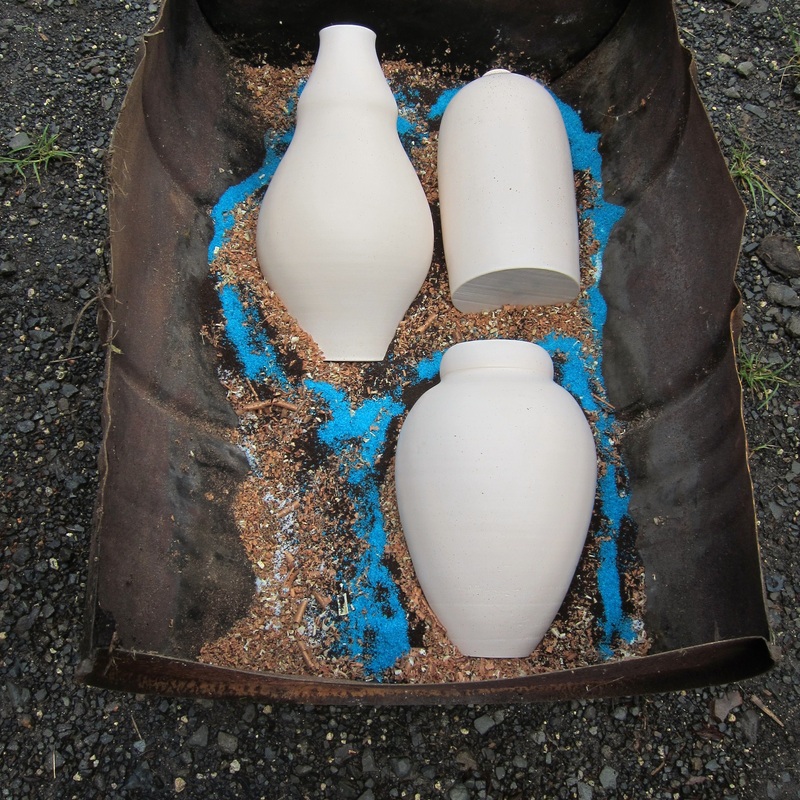
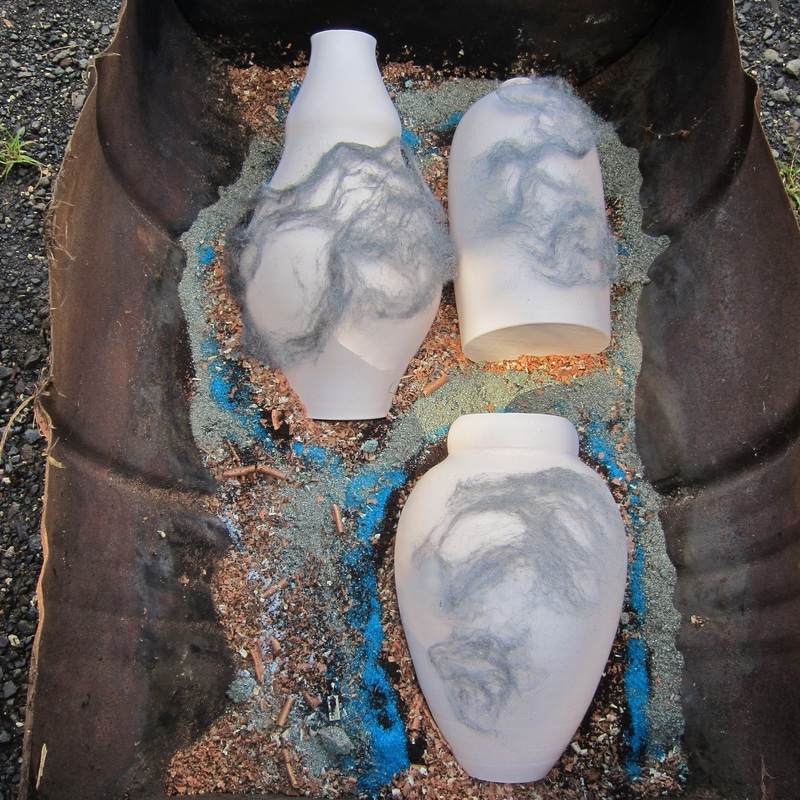
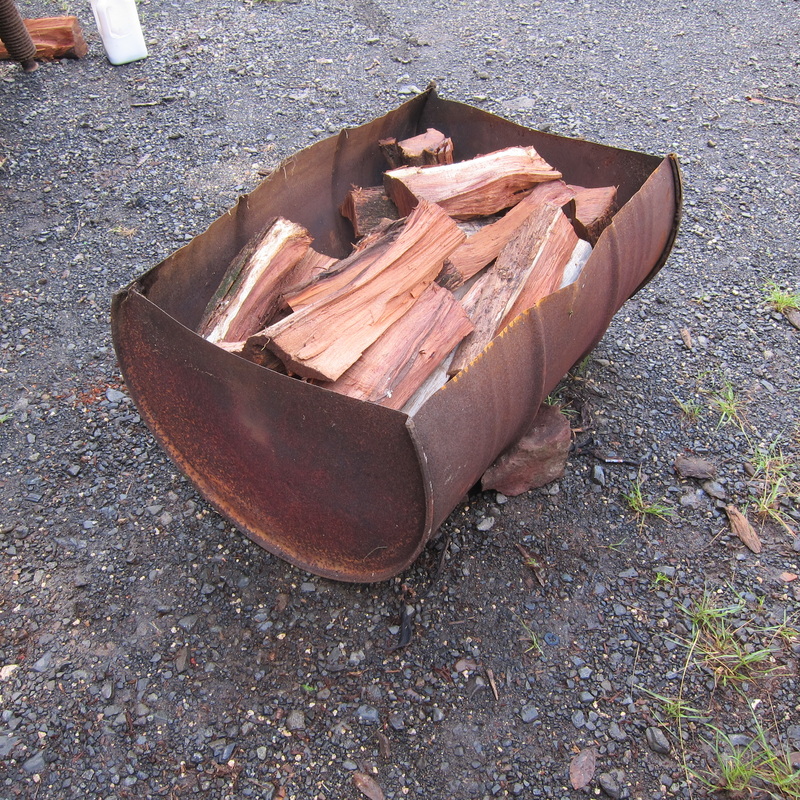
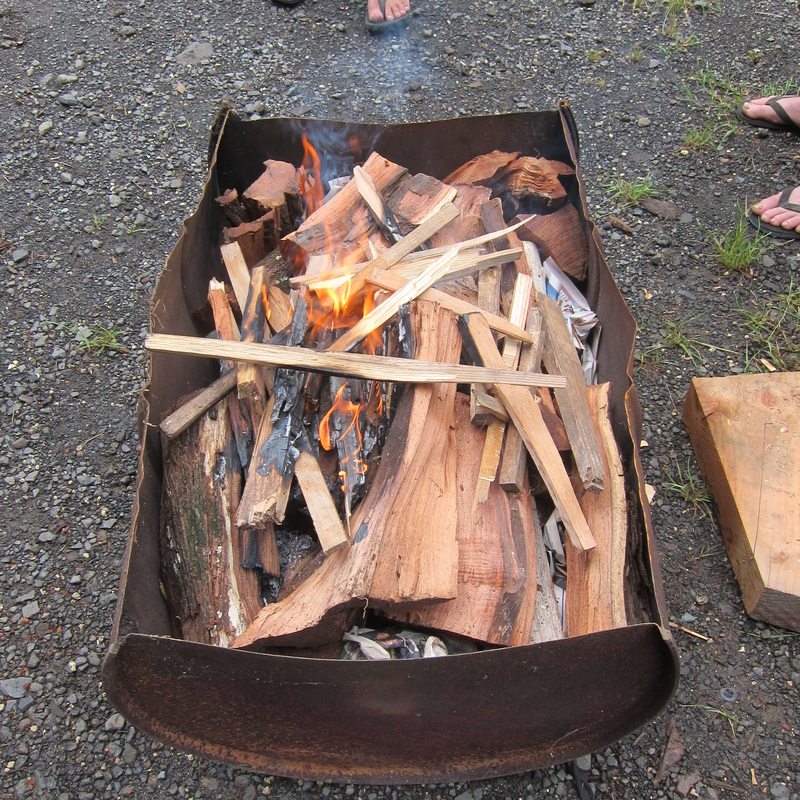
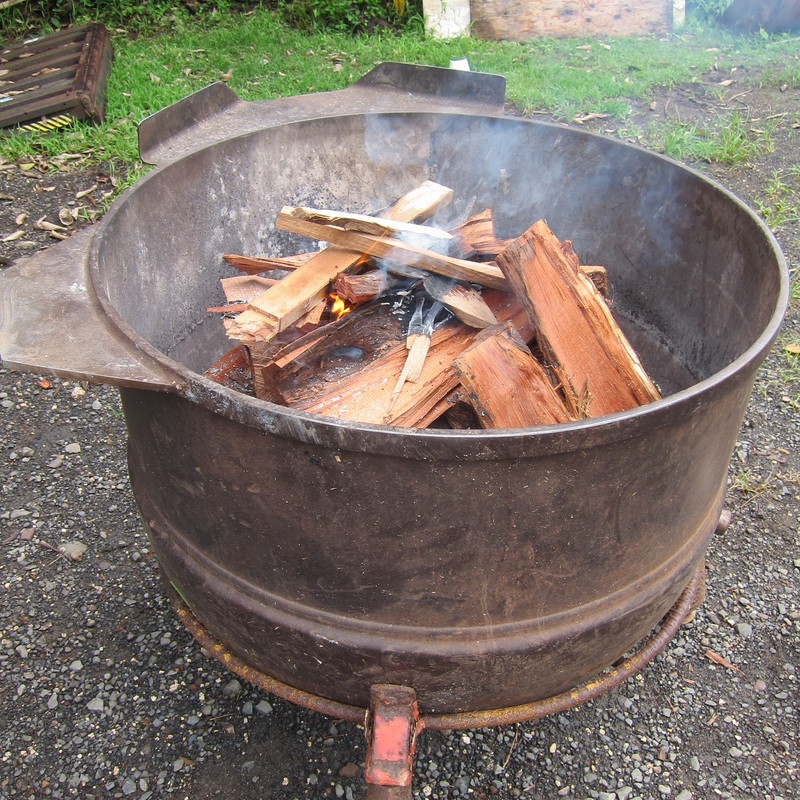
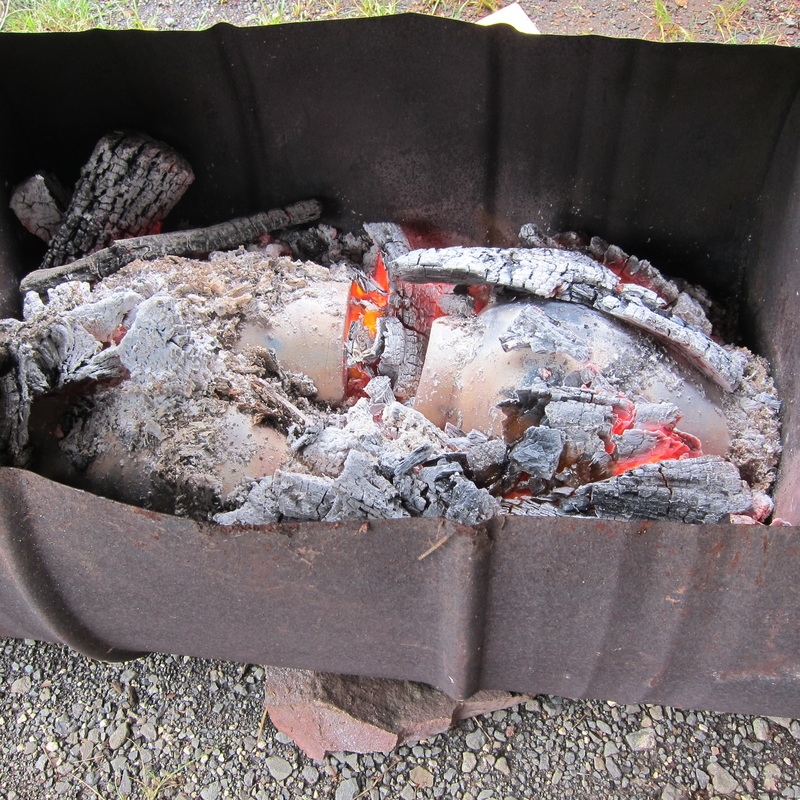
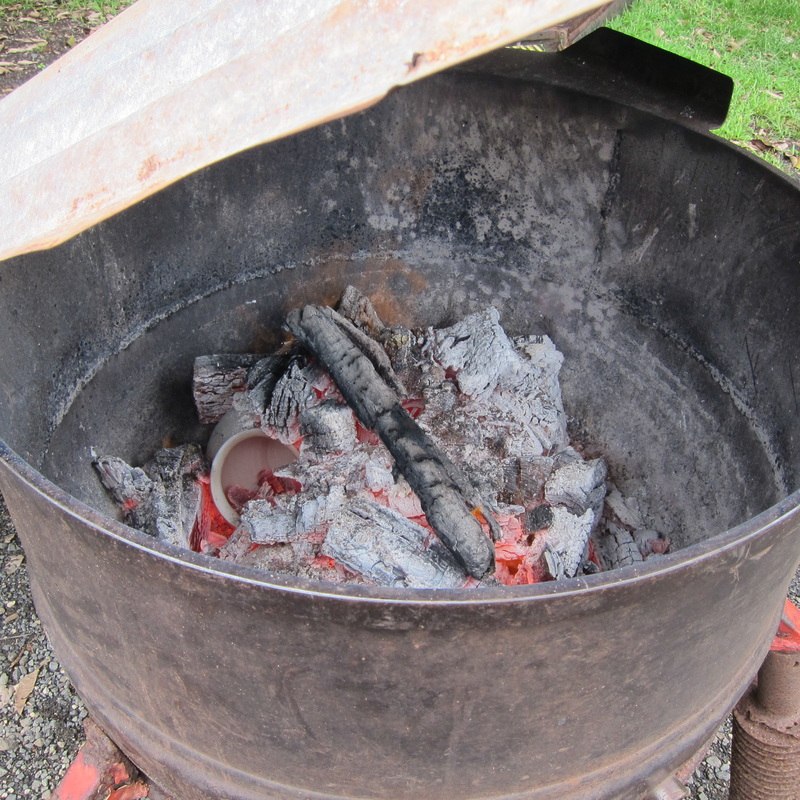
The first thing I threw around the pots was salt. After salt, I sprinkled on used coffee grounds that had been dried, then Miracle-Gro (the turquoise stuff), and then vermiculite that had a little copper sulfate mixed in. I put on a few corn husks that had been soaked in salt water and dried (probably too few to make a difference) and then put on a bunch of dried banana peels. I laid fine steel wool on one side of each pot and laid pieces of drift wood on top. Finally I laid larger pieces of kiawe wood on all the pots and then a mound of kindling. We used a blow torch to get the kindling started. Next time I'll use a little more wood as the fire didn't seem to get as hot as it should have been. Last time I pit fired we stacked the wood up just as high as we did this time, but the pieces of kiawe were much smaller so it created a denser pile that ended up burning longer and hotter.
As the fire burned down slightly, I threw some Miracle-Gro on the sides of the pots to provide more color. One thing I didn't do that I should have done was to mix copper carbonate with wood shavings and throw that over the whole fire after the flames got going. As it is, my pots ended up with very good peaches and yellows from the sodium (table salt and salt in the driftwood) and potassium (banana peels and coffee grounds), but they didn't get many burgundy patches from the copper.
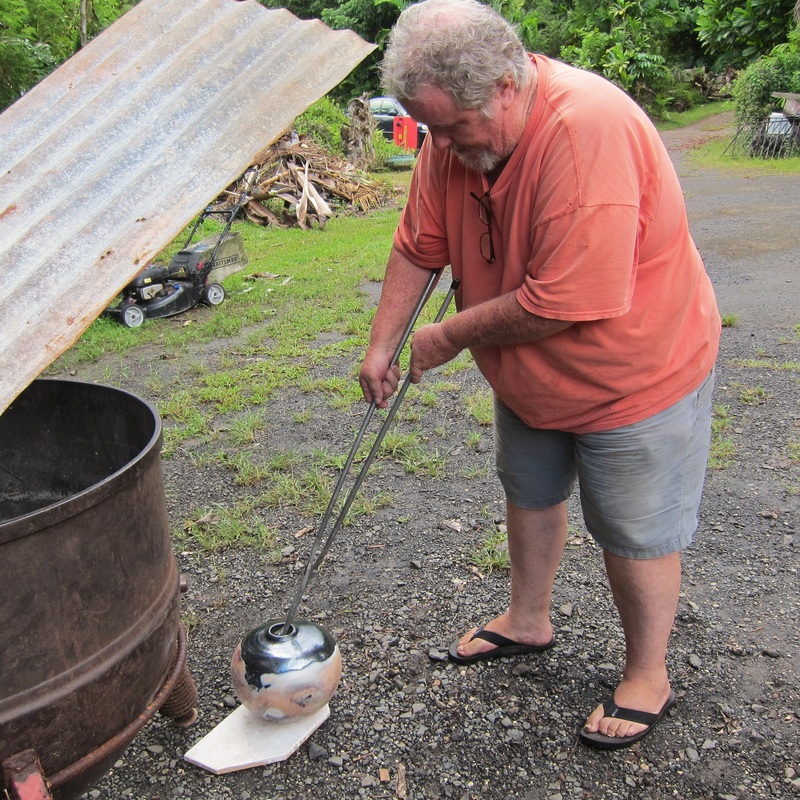
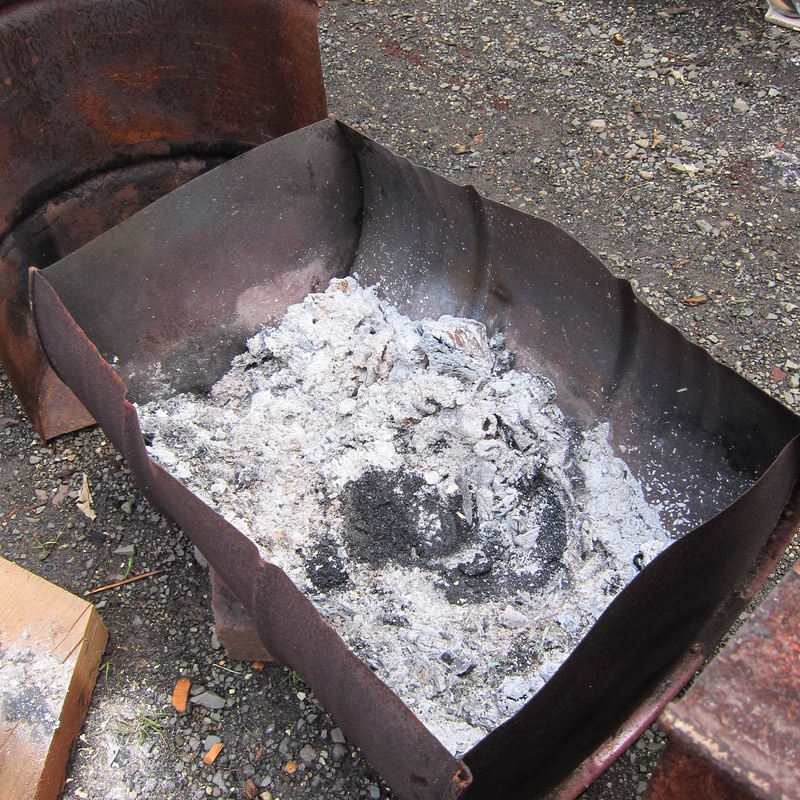
When the fire had been going about 2 hours, it started to rain. We set up pieces of corrugated roofing to protect our pots and we're glad we did. After the wood and ash had fallen away from the upper surface of the pots, we pulled them out of the coals using the same tongs we use for raku firings. Steve set his pots on pieces of kiln shelves and I set mine down on a thick piece of wood. Within an hour they were cool enough to handle. I noticed during the firing that one of my pots had developed a major crack just above the base that was about six inches long. I don't know why this happened but I threw that pot away. Using this technique, the whole process takes about six hours.
The next day was Sunday, October 5. I cleaned both of the remaining pots by running water over them and using a wet paper towel to gently rub them down. I didn't try to remove every crusty spot on the pot. I kind of like those spots! I placed both pots in the car and because it was a sunny day it took only a few hours for them to dry and heat up. When they were dry and hot, I took them out and rubbed Johnson's paste wax all over them. I buffed them with another cloth and they both looked pretty good. I decided to take one of them to the Hawaii Craftsmen 2014 Annual Statewide Juried Exhibition at the Honolulu Museum of Art School (juried by Janet Koplos) that was open for entries that morning, and it was one of two pots that I got into the show. Whew! Just in time!
This time I tried a few ideas I learned from watching Sumi von Dassow's video on Pit Firing & Burnishing as well as her book Low-firing and Burnishing (part of the Ceramics Handbook series published by A & C Black and The American Ceramic Society). In the images that follow, I show each step I took in this firing and what the results were.
I fired 3 pieces and Steve fired 4. The clay I used was B-Mix with grog. I like the whiteness of the clay but I also like how the grog helps the pots to resist thermal shock. At least that's the theory. Steve uses Soldate 60 because he thinks it offers even more protection against thermal shock. Some authors write that clays with grog can't be burnished as well as clays without grog. I'll have to try something like plain B-Mix and see what happens. In my experience so far, however, I haven't had a problem with grog roughening the surface during buffing or burnishing because I smooth out the surface with a plastic rib as the last step in throwing a pot. Steve and I both use terra sig that we purchase from Jeff Chang, a local potter who makes it himself. Next time I plan on using my own terra sig and see how that goes. I brushed on the terra sig and used a plastic grocery bag and a soft cloth for buffing. I didn't burnish any of my pieces, but Steve burnished his using vegetable oil and a rock. His pots do have a deeper shine than mine, though mine come close once I apply wax after the firing. Both of us bisqued our pots to 018. The theory is that the lower the bisque, the more porous the pots will be and the more easily they will absorb carbon and other materials that are fumed. It also means the pots are more fragile and liable to break.
The pots were placed in two different containers, mine in a half barrel with fairly high walls and Steve's in an old kettle from the kitchen of a school cafeteria. Next time I'll try a barrel with lower walls to create more exposure to the wind. We placed fine wood shavings on the bottom and then laid our pots on them. Whatever part of the pot is lying in the shavings will be exposed to more carbon which will produce black surfaces on the pot. So I placed them in ways that would make black patches on some places and not on others. I also learned a nice trick the last time we pit fired. After positioning the pots on the wood shavings, I lightly mound some of the wood shavings on the sides of the pot. At first, these areas will turn black from the carbon in the wood shavings. As the shavings burn away, however, these areas will be directly exposed to the fire. If the fire is hot enough, it will burn most of the carbon away in those areas but leave a "halo," a dark outline with an inside that's whitish grey. If the carbon burns away when there's still material that's vaporizing around them, you may get some color from fuming. It gives the pot a kind of air-brushed look in those places. You can see some examples of this in the images below.
After the pots were positioned in the barrel, I began putting in different materials to act as colorants. I don't know if there's any particular order that's better than another, but this is the order I used for this firing. I would say in general, however, that when you're using chemical powders or salt, it's best not to throw them directly on the pot. If placed directly on the pot, they may leave dark crusty patches on the pot instead of fuming them. But if that's the effect you're looking for, then throw them on! Organic materials such as corn husks, banana peels, coffee grounds, and seaweed can be put directly on pots. However, they will have some effect such as shielding certain parts of the pot from other colorants (at least for awhile) and they also contain carbon that will mark pots as well. In other words, their effect is a complex one and complex in this case can be good.
The first thing I threw around the pots was salt. After salt, I sprinkled on used coffee grounds that had been dried, then Miracle-Gro (the turquoise stuff), and then vermiculite that had a little copper sulfate mixed in. I put on a few corn husks that had been soaked in salt water and dried (probably too few to make a difference) and then put on a bunch of dried banana peels. I laid fine steel wool on one side of each pot and laid pieces of drift wood on top. Finally I laid larger pieces of kiawe wood on all the pots and then a mound of kindling. We used a blow torch to get the kindling started. Next time I'll use a little more wood as the fire didn't seem to get as hot as it should have been. Last time I pit fired we stacked the wood up just as high as we did this time, but the pieces of kiawe were much smaller so it created a denser pile that ended up burning longer and hotter.
As the fire burned down slightly, I threw some Miracle-Gro on the sides of the pots to provide more color. One thing I didn't do that I should have done was to mix copper carbonate with wood shavings and throw that over the whole fire after the flames got going. As it is, my pots ended up with very good peaches and yellows from the sodium (table salt and salt in the driftwood) and potassium (banana peels and coffee grounds), but they didn't get many burgundy patches from the copper.
When the fire had been going about 2 hours, it started to rain. We set up pieces of corrugated roofing to protect our pots and we're glad we did. After the wood and ash had fallen away from the upper surface of the pots, we pulled them out of the coals using the same tongs we use for raku firings. Steve set his pots on pieces of kiln shelves and I set mine down on a thick piece of wood. Within an hour they were cool enough to handle. I noticed during the firing that one of my pots had developed a major crack just above the base that was about six inches long. I don't know why this happened but I threw that pot away. Using this technique, the whole process takes about six hours.
The next day was Sunday, October 5. I cleaned both of the remaining pots by running water over them and using a wet paper towel to gently rub them down. I didn't try to remove every crusty spot on the pot. I kind of like those spots! I placed both pots in the car and because it was a sunny day it took only a few hours for them to dry and heat up. When they were dry and hot, I took them out and rubbed Johnson's paste wax all over them. I buffed them with another cloth and they both looked pretty good. I decided to take one of them to the Hawaii Craftsmen 2014 Annual Statewide Juried Exhibition at the Honolulu Museum of Art School (juried by Janet Koplos) that was open for entries that morning, and it was one of two pots that I got into the show. Whew! Just in time!

 RSS Feed